This is going to be the first post in a series called “javascript data structures and algorithms”. I plan to cover most of the algorithms found in computer science classes, using javascript as a language of choice. This is no easy feat to take on, but it is a goal i have set. It may take a while to complete as i have a full time job, but i will do my best. I do not consider myself an expert on the subject matter, so kindly advise if you ever think something can be coded in a much more efficient way. The only reason i write this post, like all other posts, is to get a better understanding of the subject matter. If you think you have master anything, teach it so others can validate it. We start our journey with linked lists, particularly singly linked list. Lets go!
A data structure is a way of organizing and storing data. A Linked List is a type of data structure. There are many different types, each representing different ways or storing and accessing data. As a software developer, understanding these structures is crucial when solving problems. Choosing a wrong data structure can lead to bad application performance and efficiency, so its important that we understand them in order to properly use them. Not all data structures are created equally. One might be better at doing one thing than another, or vice versa. Knowing the strengths and weakness of the data structures you choose will help you build highly efficient applications. For example some data structures can store data very fast, but are poor at searching through them. If fast storage is the highest priority in your app requirements then maybe this might be the best data structure to use. Perhaps, searching and retrieving data is more important, in which case a data structure that is great at searching might be preferred. In an ideal world we would have just one data structure. But that is not the case. We have a plethora of data structures to choose from, we only need to choose them wisely. Choice can be a powerful thing!
Before reading this post make sure you have a good understanding of javascript objects and prototypal inheritance. If you do not, you have read these pre-requisite posts
You can download or clone the source code for this project on github : HERE!
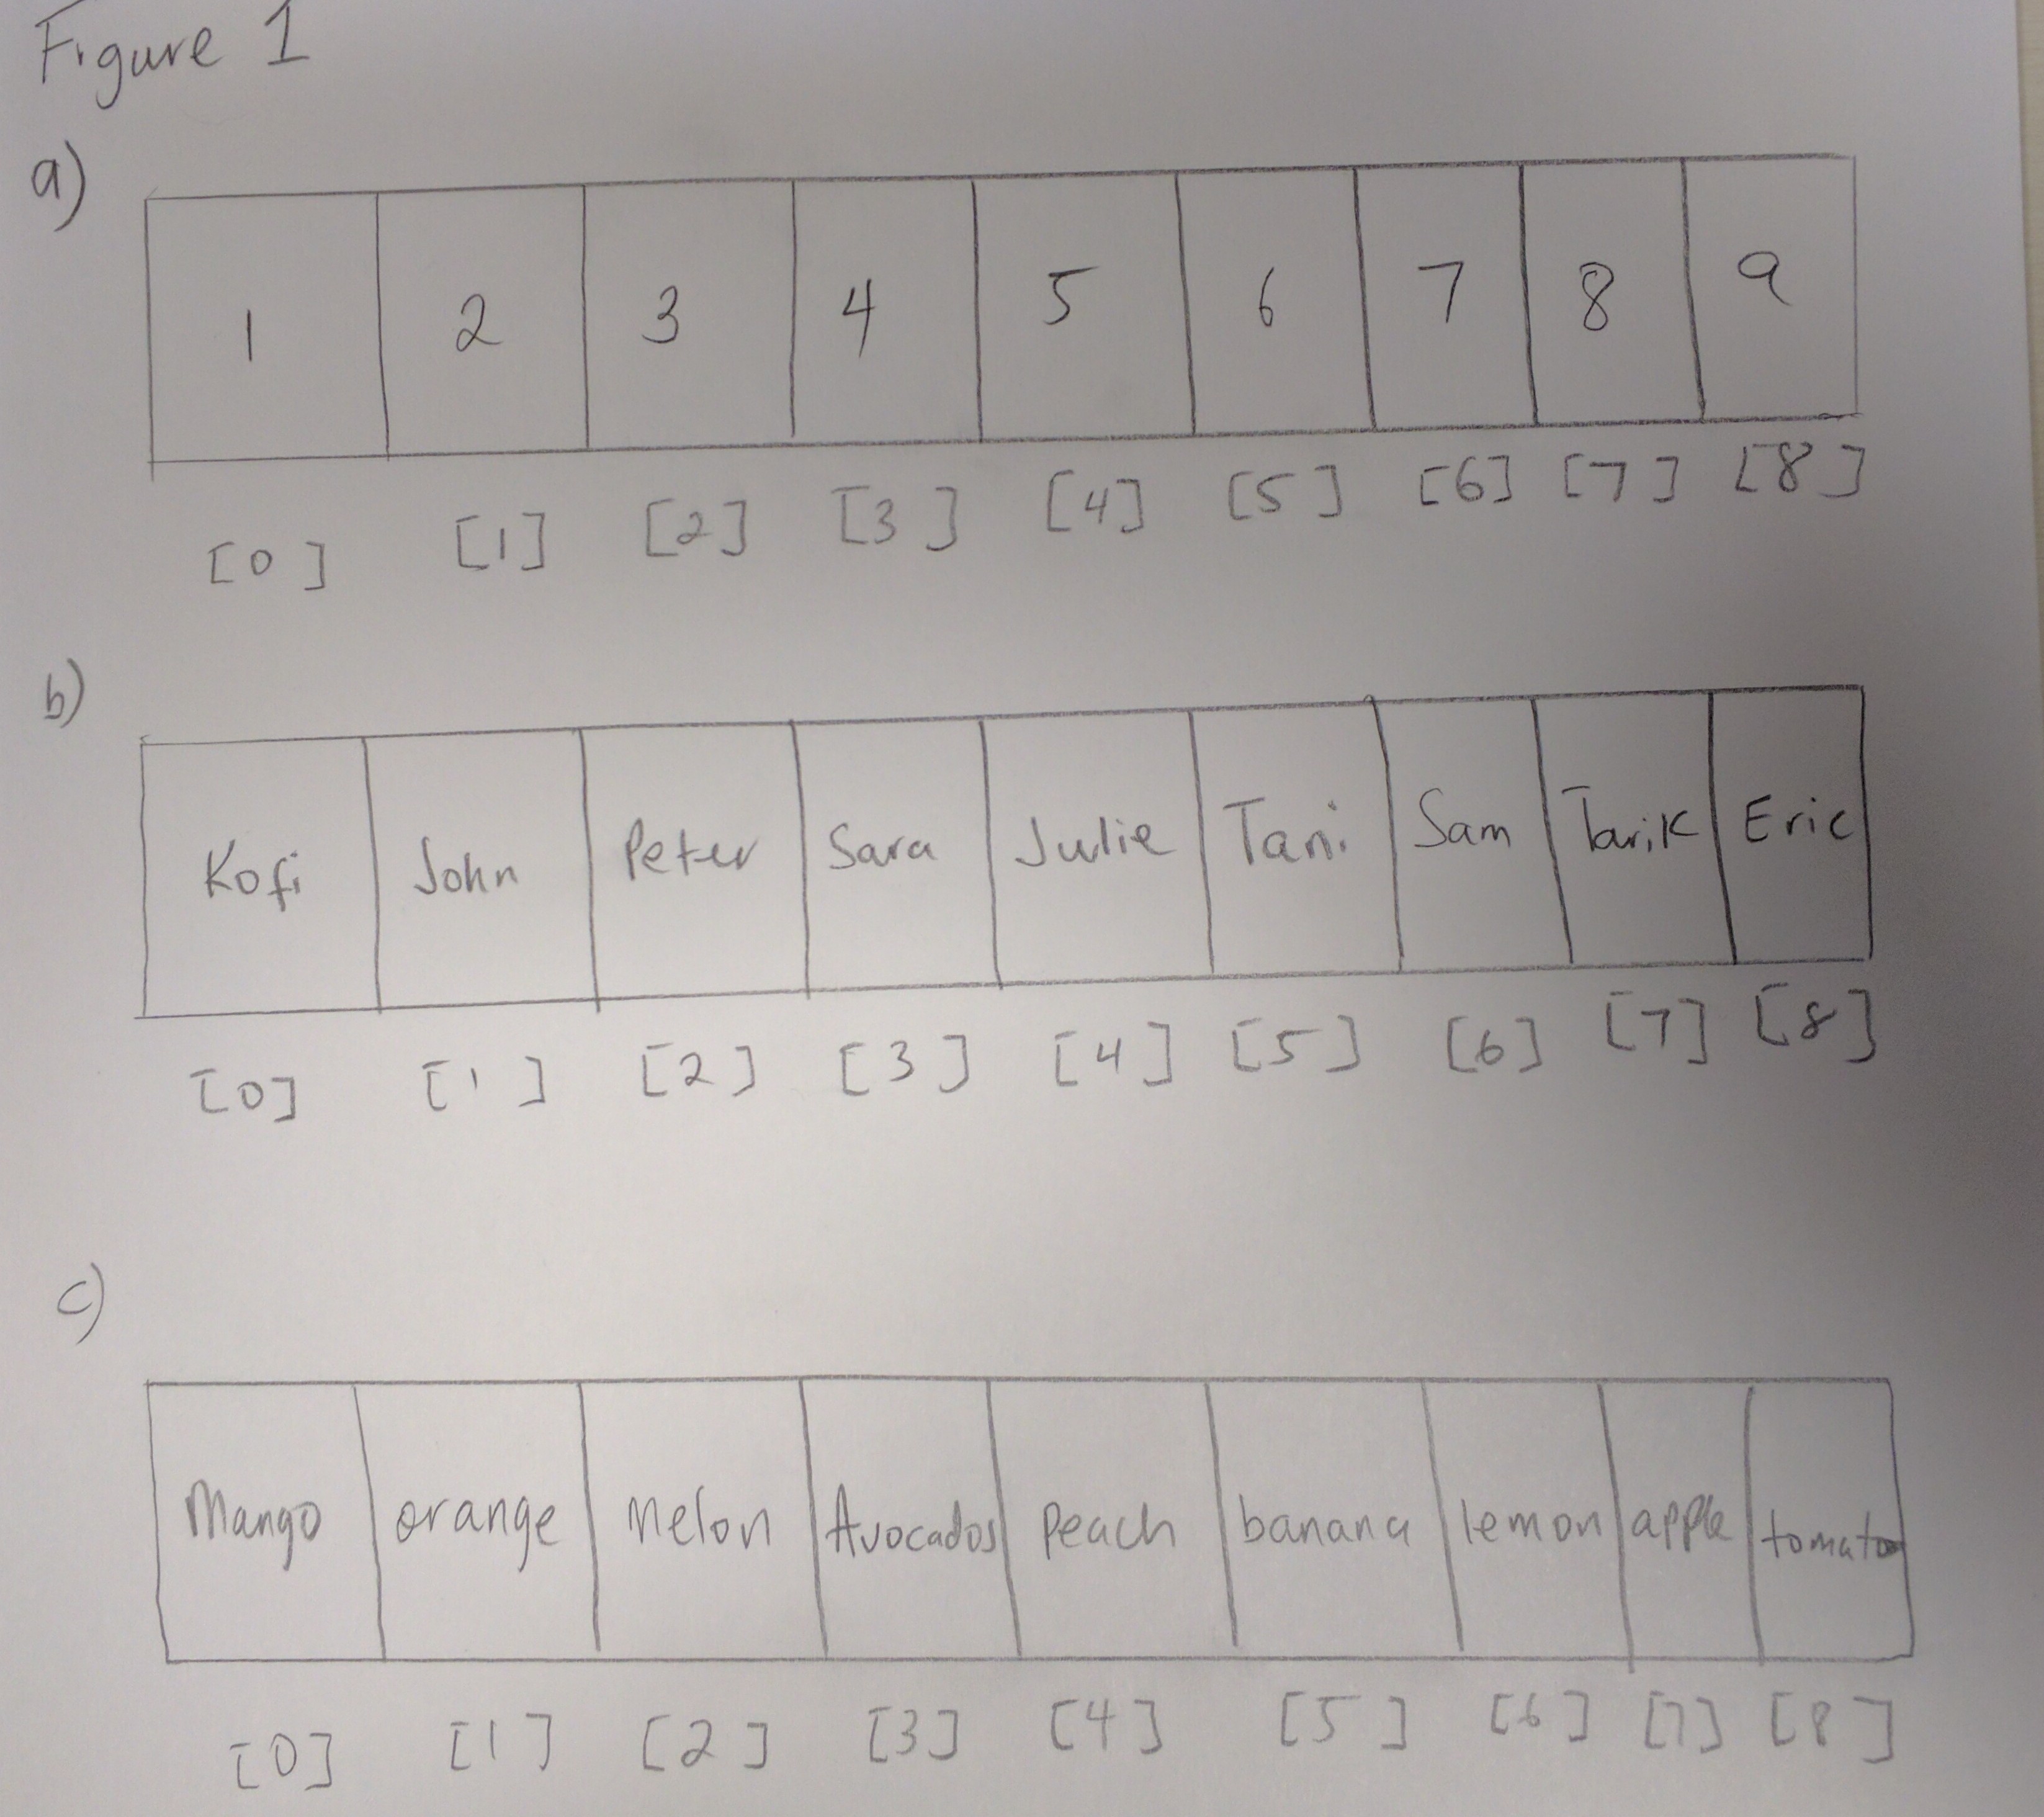
Perhaps the most commonly used data structure is an array. We have all used them (they are sometimes even called lists). Arrays store linear collections of data where elements can be accessed through their indices (non-negative integers e.g. 0, 1, 2, 3, etc). Because data is located via index numbers you can retrieve them very fast! Ask for data located in index 3 and you get it pronto!
Notice how data sits next to each other. The figure above is a visual presentation of how arrays look like in memory. This is how data is stored in an Array (next to each other). In figure 1c, notice to retrieve “Peach”, you have to access the array at index 4. Take a look at the diagram and make sure you understand it.
A linked list also stores a sequential collections of data, but the way it does this is different from arrays. Within a linked list, you will find a collection of nodes. See image below which represents a singly linked list ( a type of linked list), each circle represents a node that stores information about itself and has a reference pointing to the next node. We will soon be talking about other types of linked lists. The data found in the node is sometimes called an element. Imagine that all these nodes live in a container. This container IS what we will call our linked list (it is a collection of nodes).
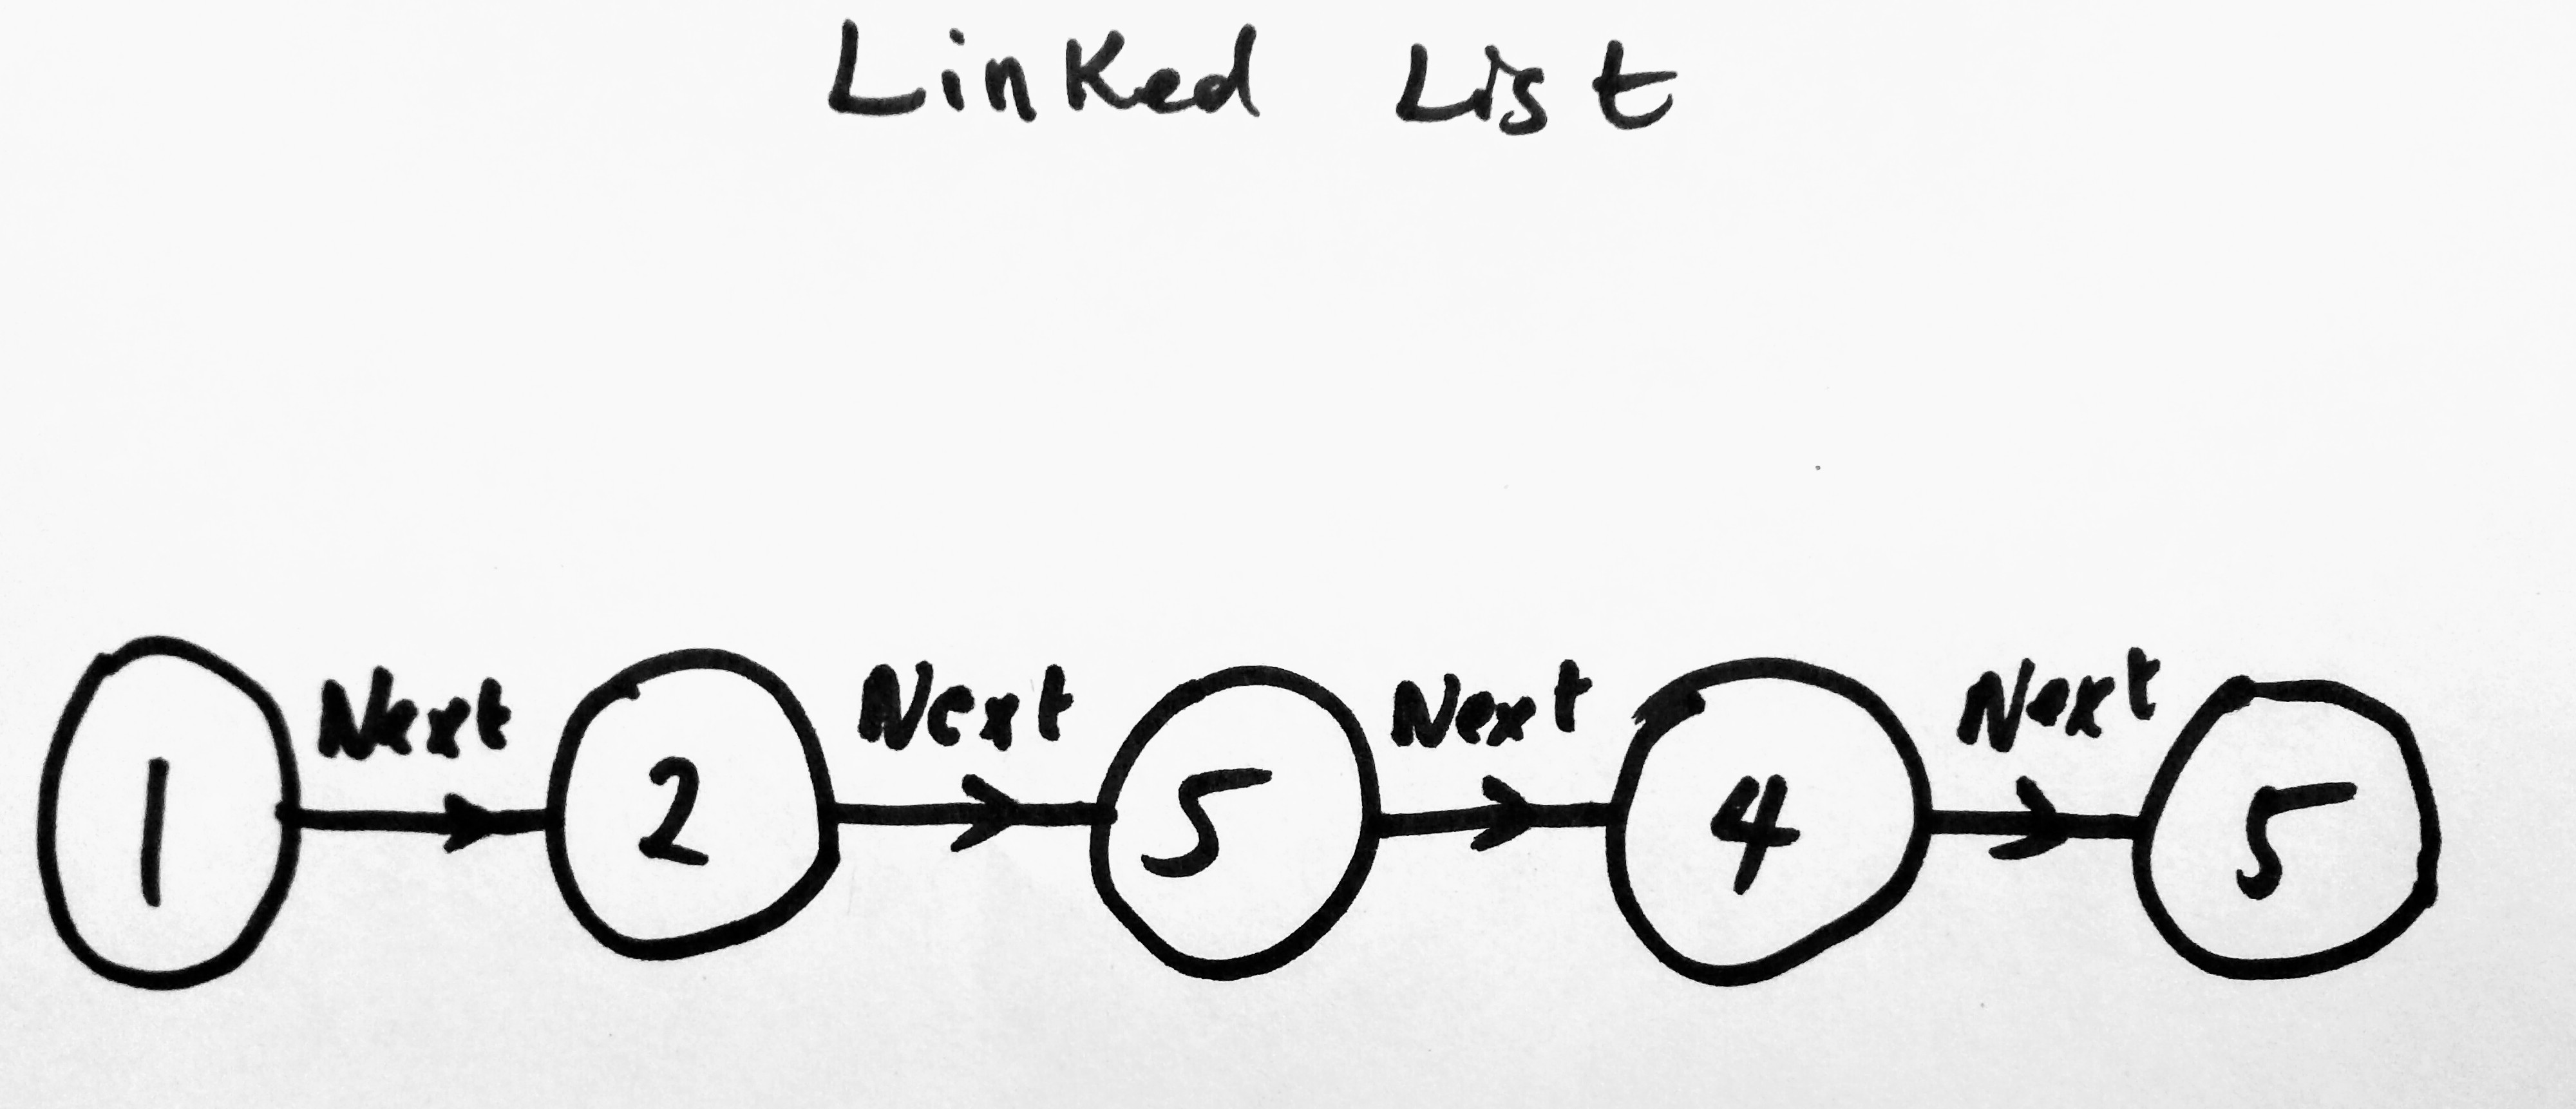
A Linked List is faster at adding data quickly, than it is at retrieving. So if saving data is more prevalent in your app than searching, then this might be the best data structure for you. Its not that a linked list is terrible at searching, however there are data structures that are faster at doing that, like a hash table. It also does not mean that hash table is the best. Again all data structures come with their pros and cons. Lets see another representation of the above diagram to prove a point.
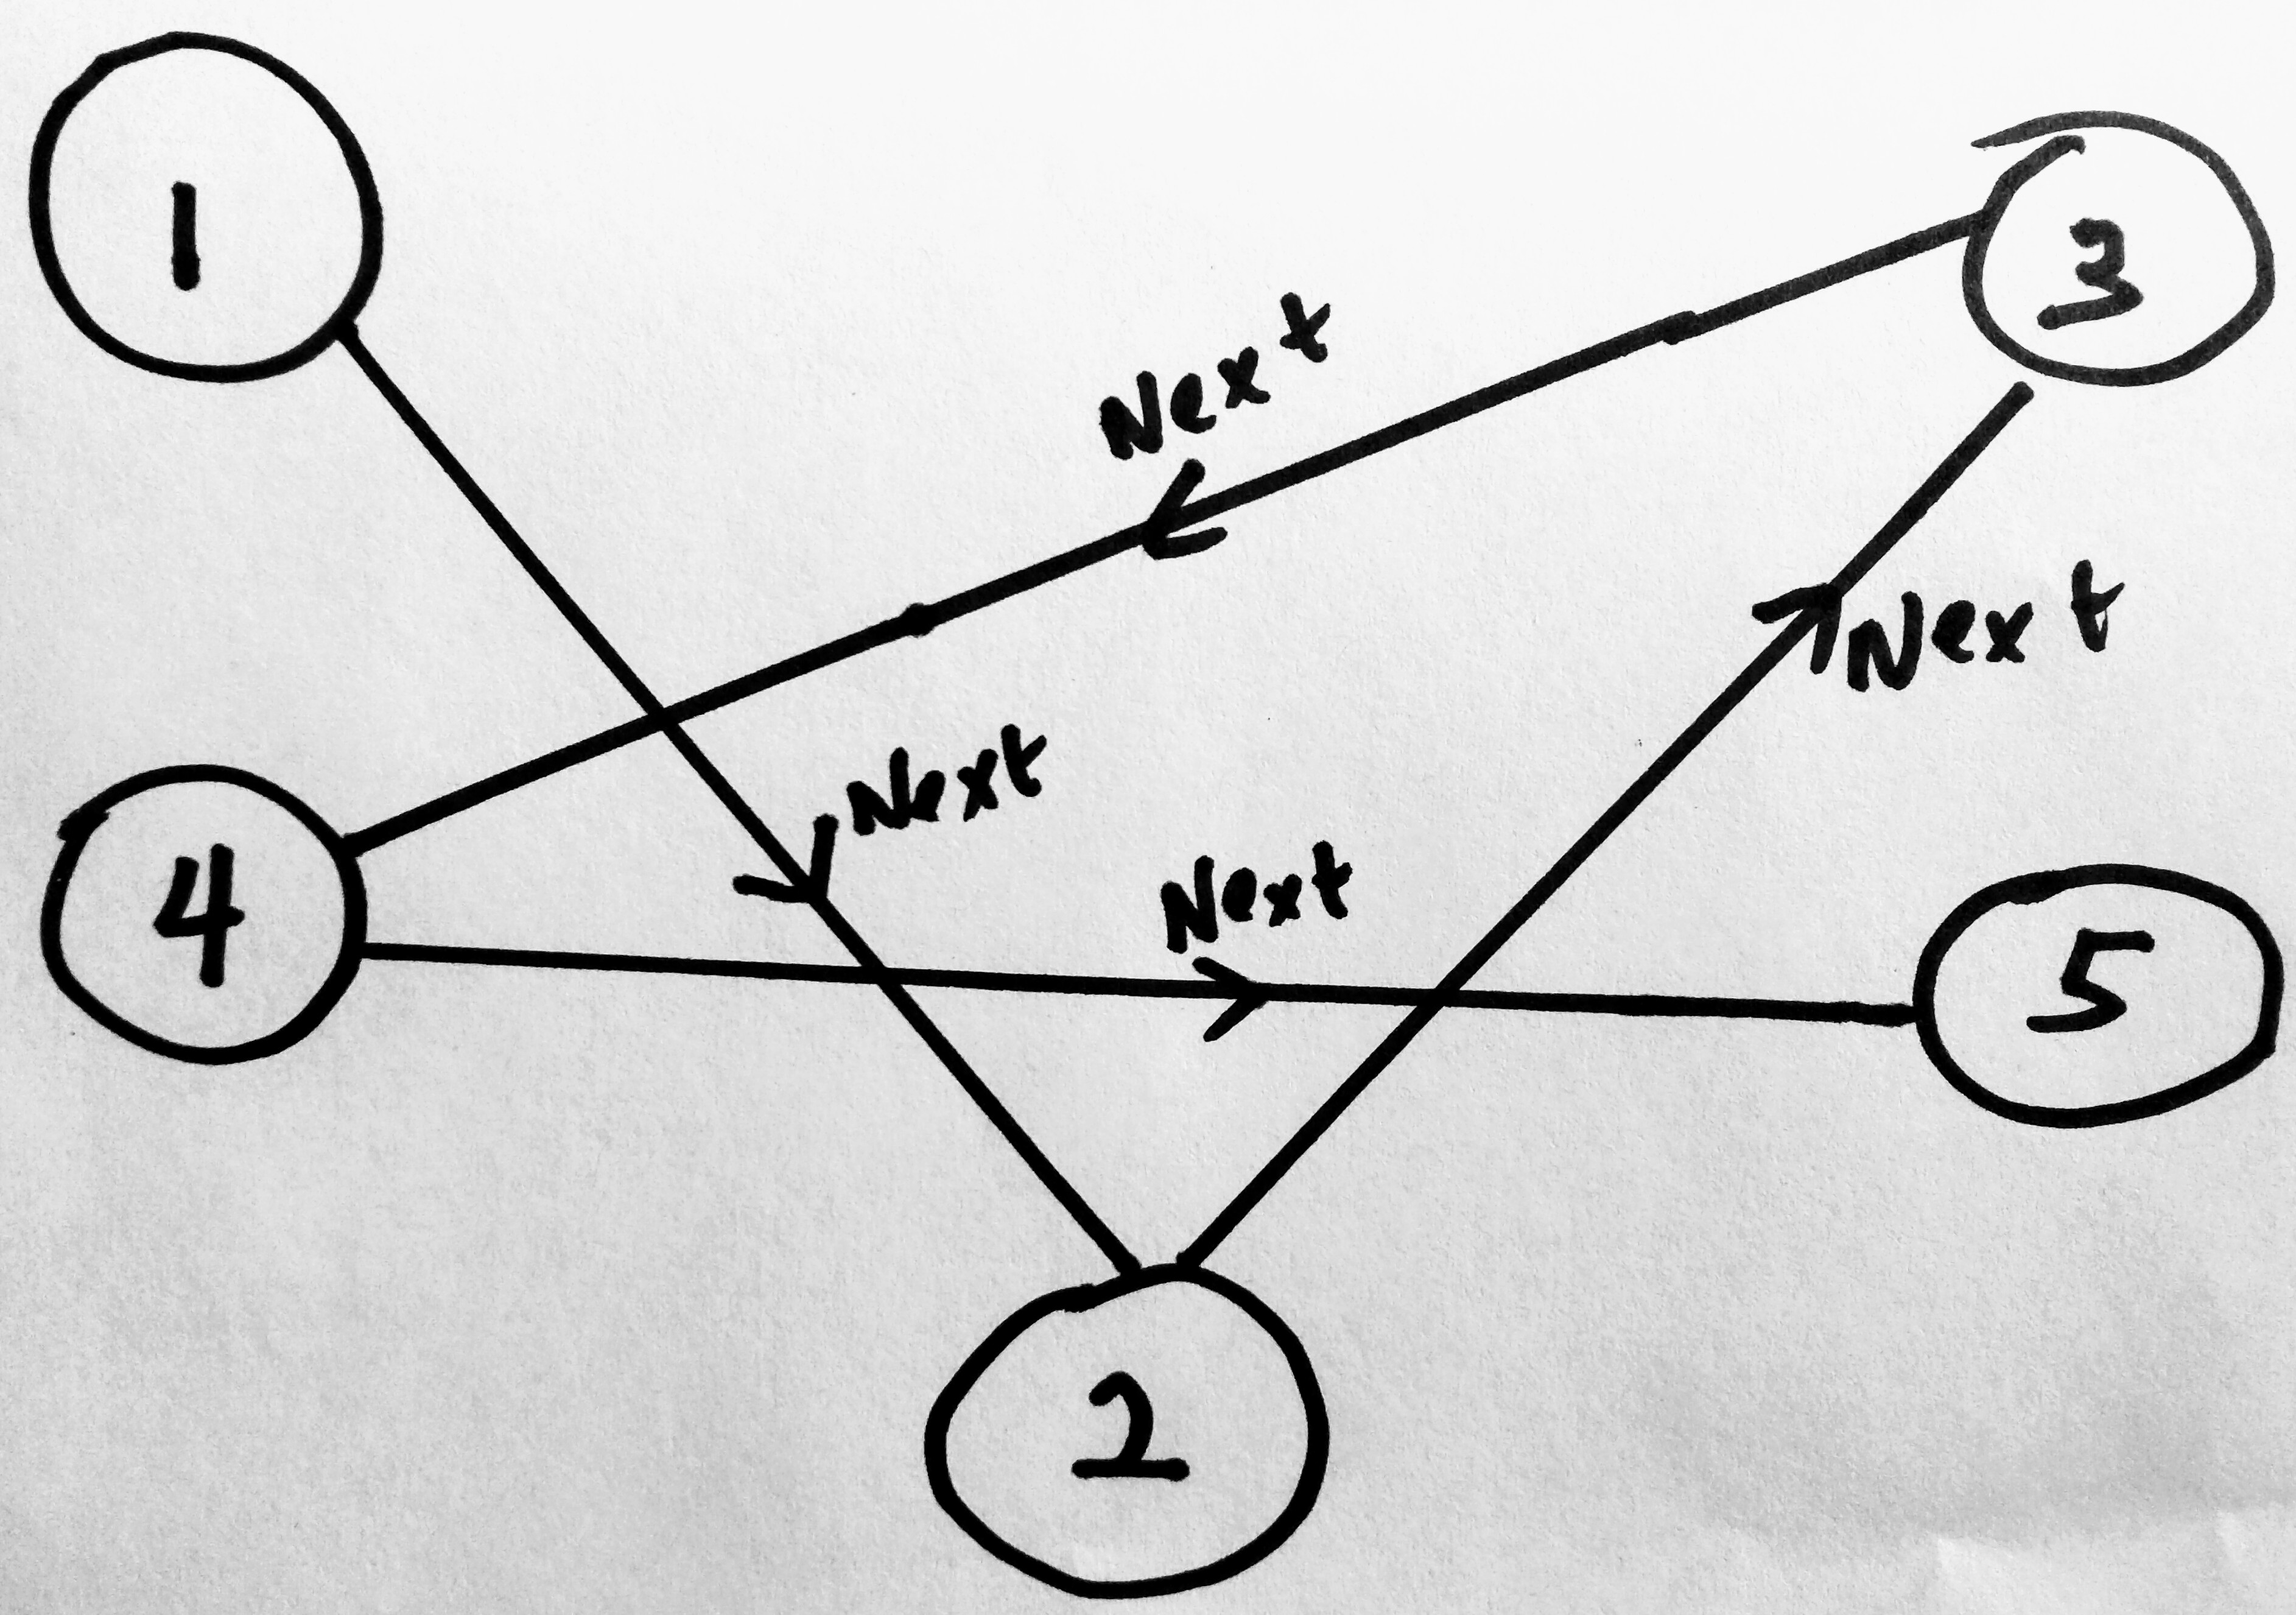
Note that Linked Lists(LL) do not need to sit next to each other like arrays do. The nodes are “linked” together by a pointer. In a singly linked list (other linked list types are doubly and circular), each node ONLY has a reference to the node after it (the next pointer). In a doubly linked list, the LL nodes have two pointers (one to the next node, the other to the previous). We will cover doubly linked lists in the next post. The point i am making here is, when a node is added to a linked list, it can sit anywhere in memory. In the diagram above, the node with value 1 knows how to reach its next node 2. It knows where in memory it sits, as node 4 know where node 5 sits. Lets say you wanted to add node 6 to the above diagram, you would have to tell node 5 to update its next pointer. If you want to add a node in between already existing nodes, for example you want to add 4a in between 4 and 5, then you would change the next point on 4 to point to 4a and tell 4a to point to 5.
If you did this placement in an array the JS engine would have to reindex the entire array collection, which can be expensive depending on size of the array. Most developers are blind to this behind the scene operation. But in a linked list implementation, we only update the pointers, which will have a constant time complexity. With arrays, the size of the array determines how much work needs to be done in the background to reindex. Hence the reason why Linked Lists are faster at add and remove operations.
For simplicity however, when diagramming in this post we will use a straight line to represent linked lists. But know that they sit in different locations in memory.
Head and Tail
For a linked list to function properly, it only needs to know about 2 nodes in the entire collection. It needs to know about the head and tail node pointers. The head node pointer marks the beginning of the node, and the tail node pointer marks the end. In most implementations of the LinkedList you will not see a tail. Why? A tail is really not needed as the next pointer of the last element in a singly or doubly linked list is always null. We include it in our implementation because it gives us certain benefits. If we always know what the tail is in our linked list, we can perform certain operations faster. Linked list operations that do not keep a reference to the tail have a O(n) for adding/removing from the tail or end of list. But we can change that to O(1), by keeping a reference to it. Lets see how this looks visually.
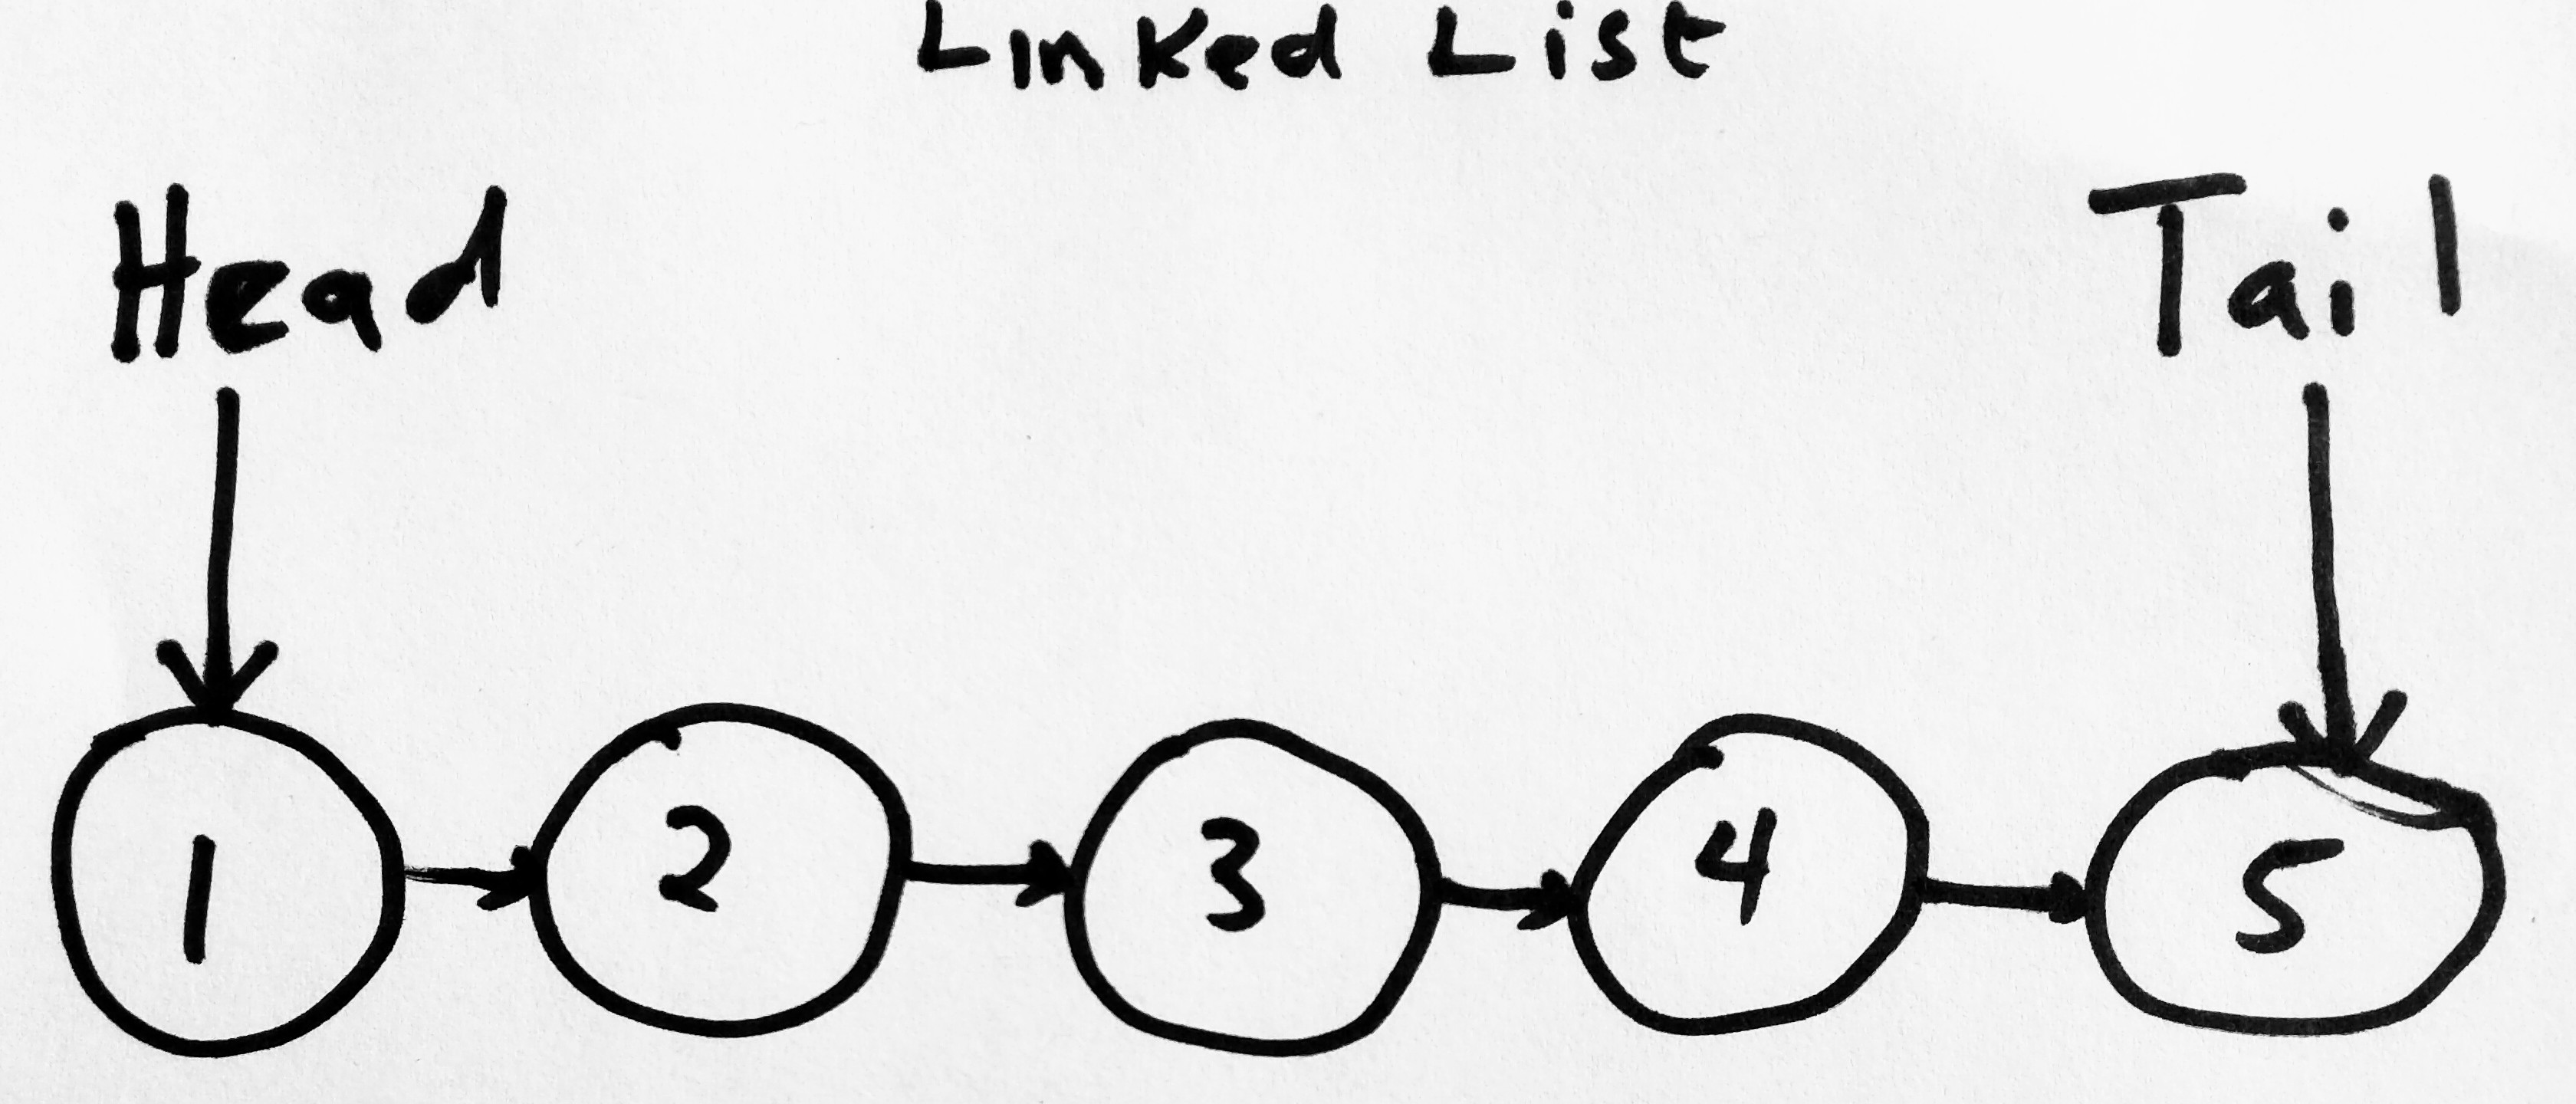
As you can see, we have a linked list with nodes. Nothing new here. However we see added new elements to our collection. We now have a head which points to node 1 and a tail, which points to node 5. The tails next is always null. The linked list data structure is really concerned about these two node. If we wanted to perform a search on linked list for example (to find data), we would need to know where to begin or perhaps where to end. The head and tail pointer helps the linked list make this decision. So what kind of things(operations) we can perform on a linked list? We may want to add a new node to mark the beginning of our linked list, in which case the header now points to that node, or we may want to add a new node to the end of the linked list, in which case the tail now points to that node.
Here is how you can think about it: Look at the Linked list above (with the head and tail). Now imagine we add a new node to this collection that we want to mark as the beginning. Lets say this node is called zero(0). When you add this node, you will change the pointer of head, to point to zero and not 1. The same for the tail. Lets add a node called 6 that we want to mark as the end of the list. Adding 6, we will now change our tail pointer to 6. We know we are at the tail because its next is null. Perhaps a diagram will be better for clarity.
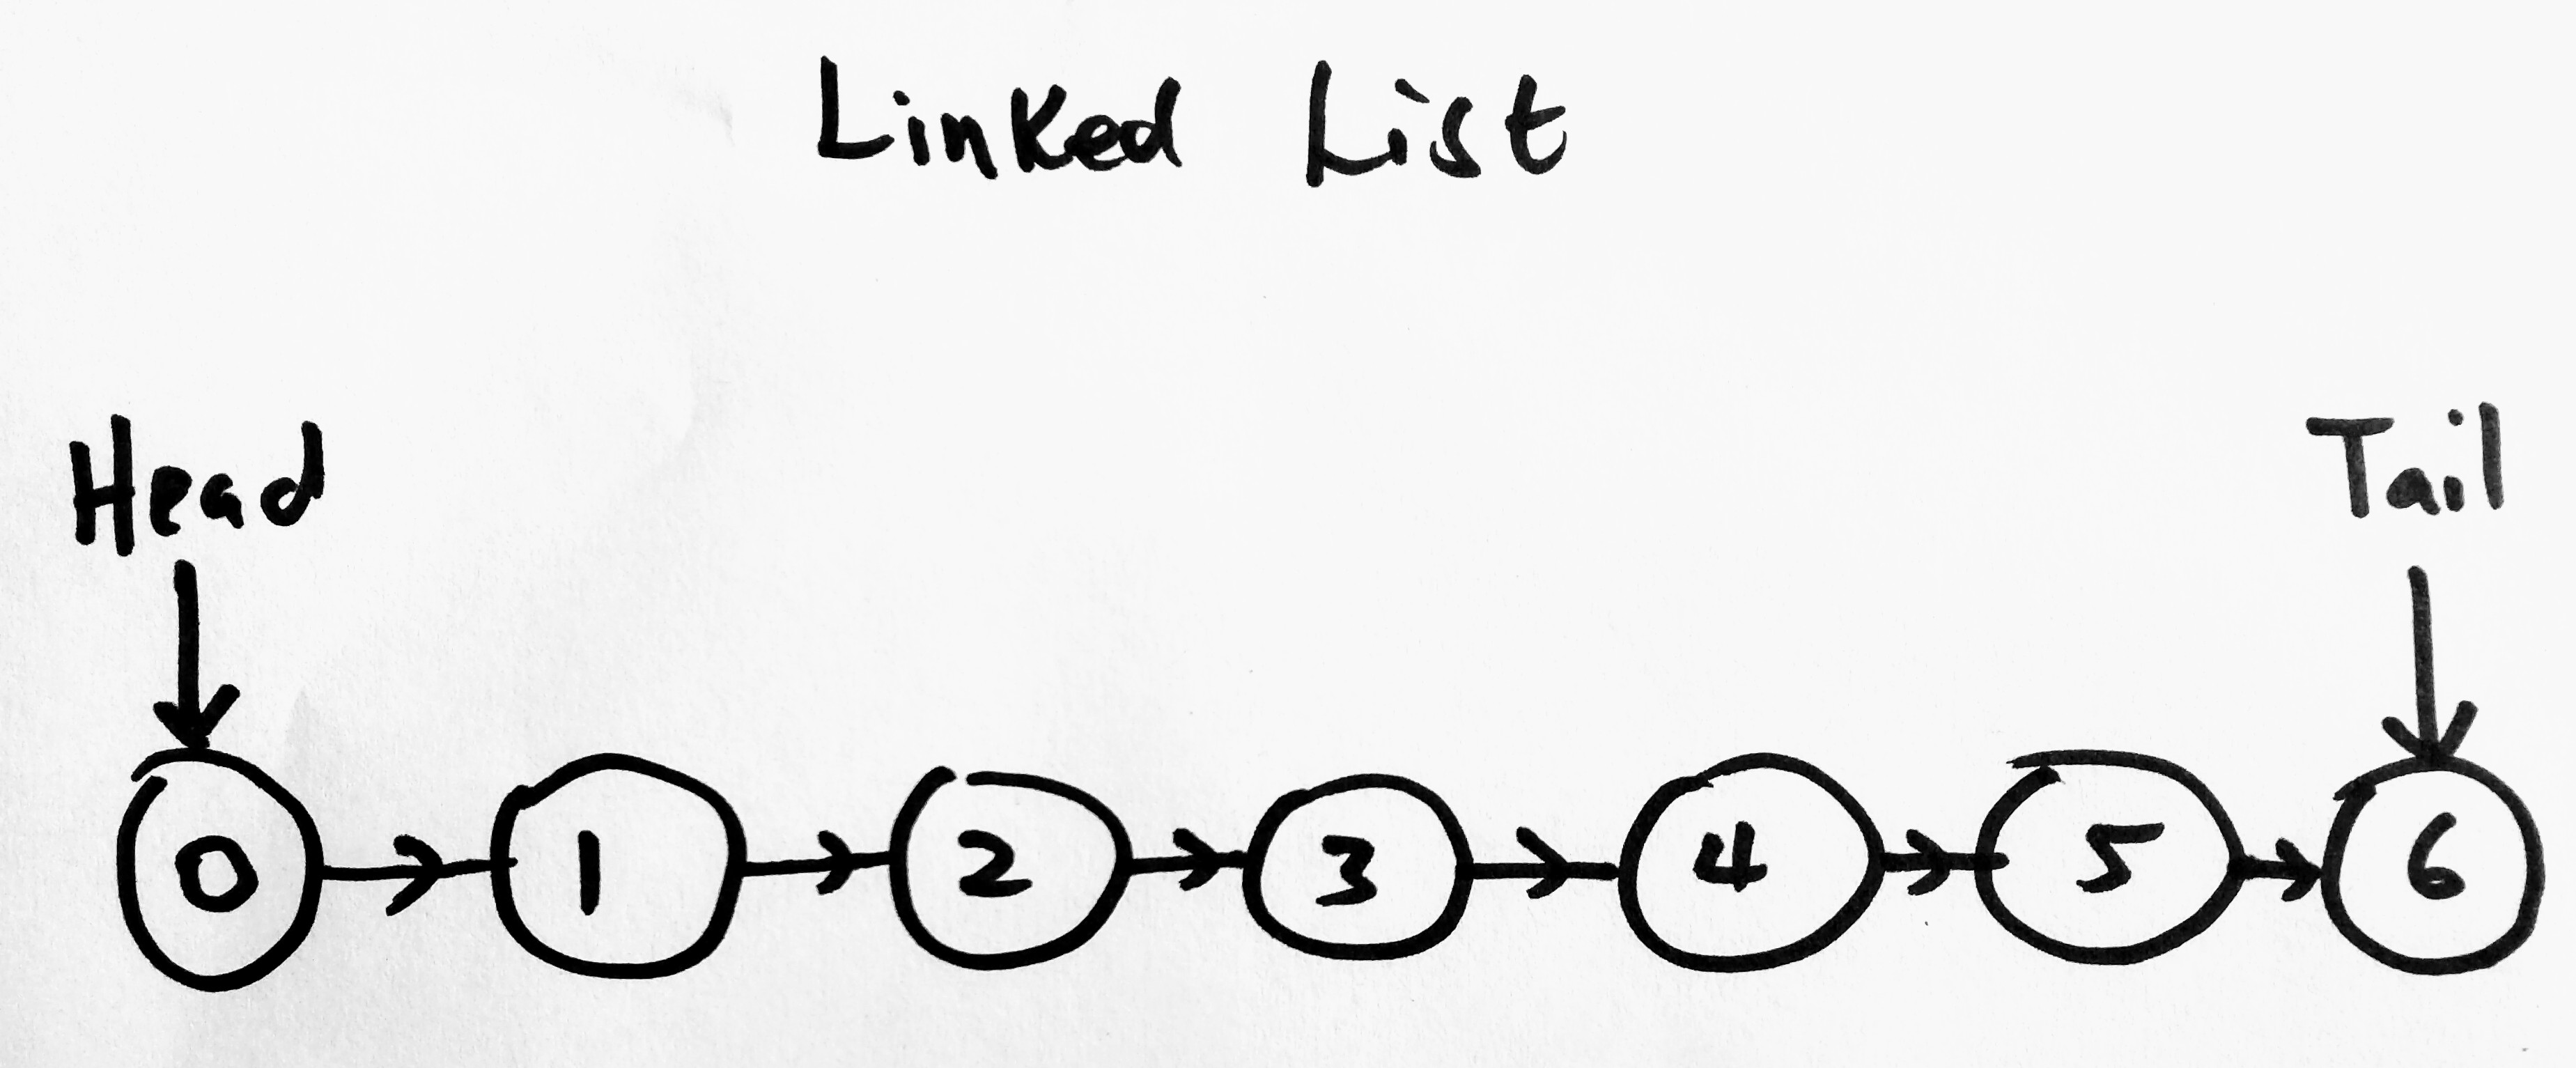
Notice that the head and tail now point to the new nodes(no longer 1 and 5). This may be what you might want to do in your collection. Perhaps you want to add a new node in the middle, before or after a particular node. Or maybe you want to delete a node from the middle. There are many things one might want to do. Lets take a look at add and remove.
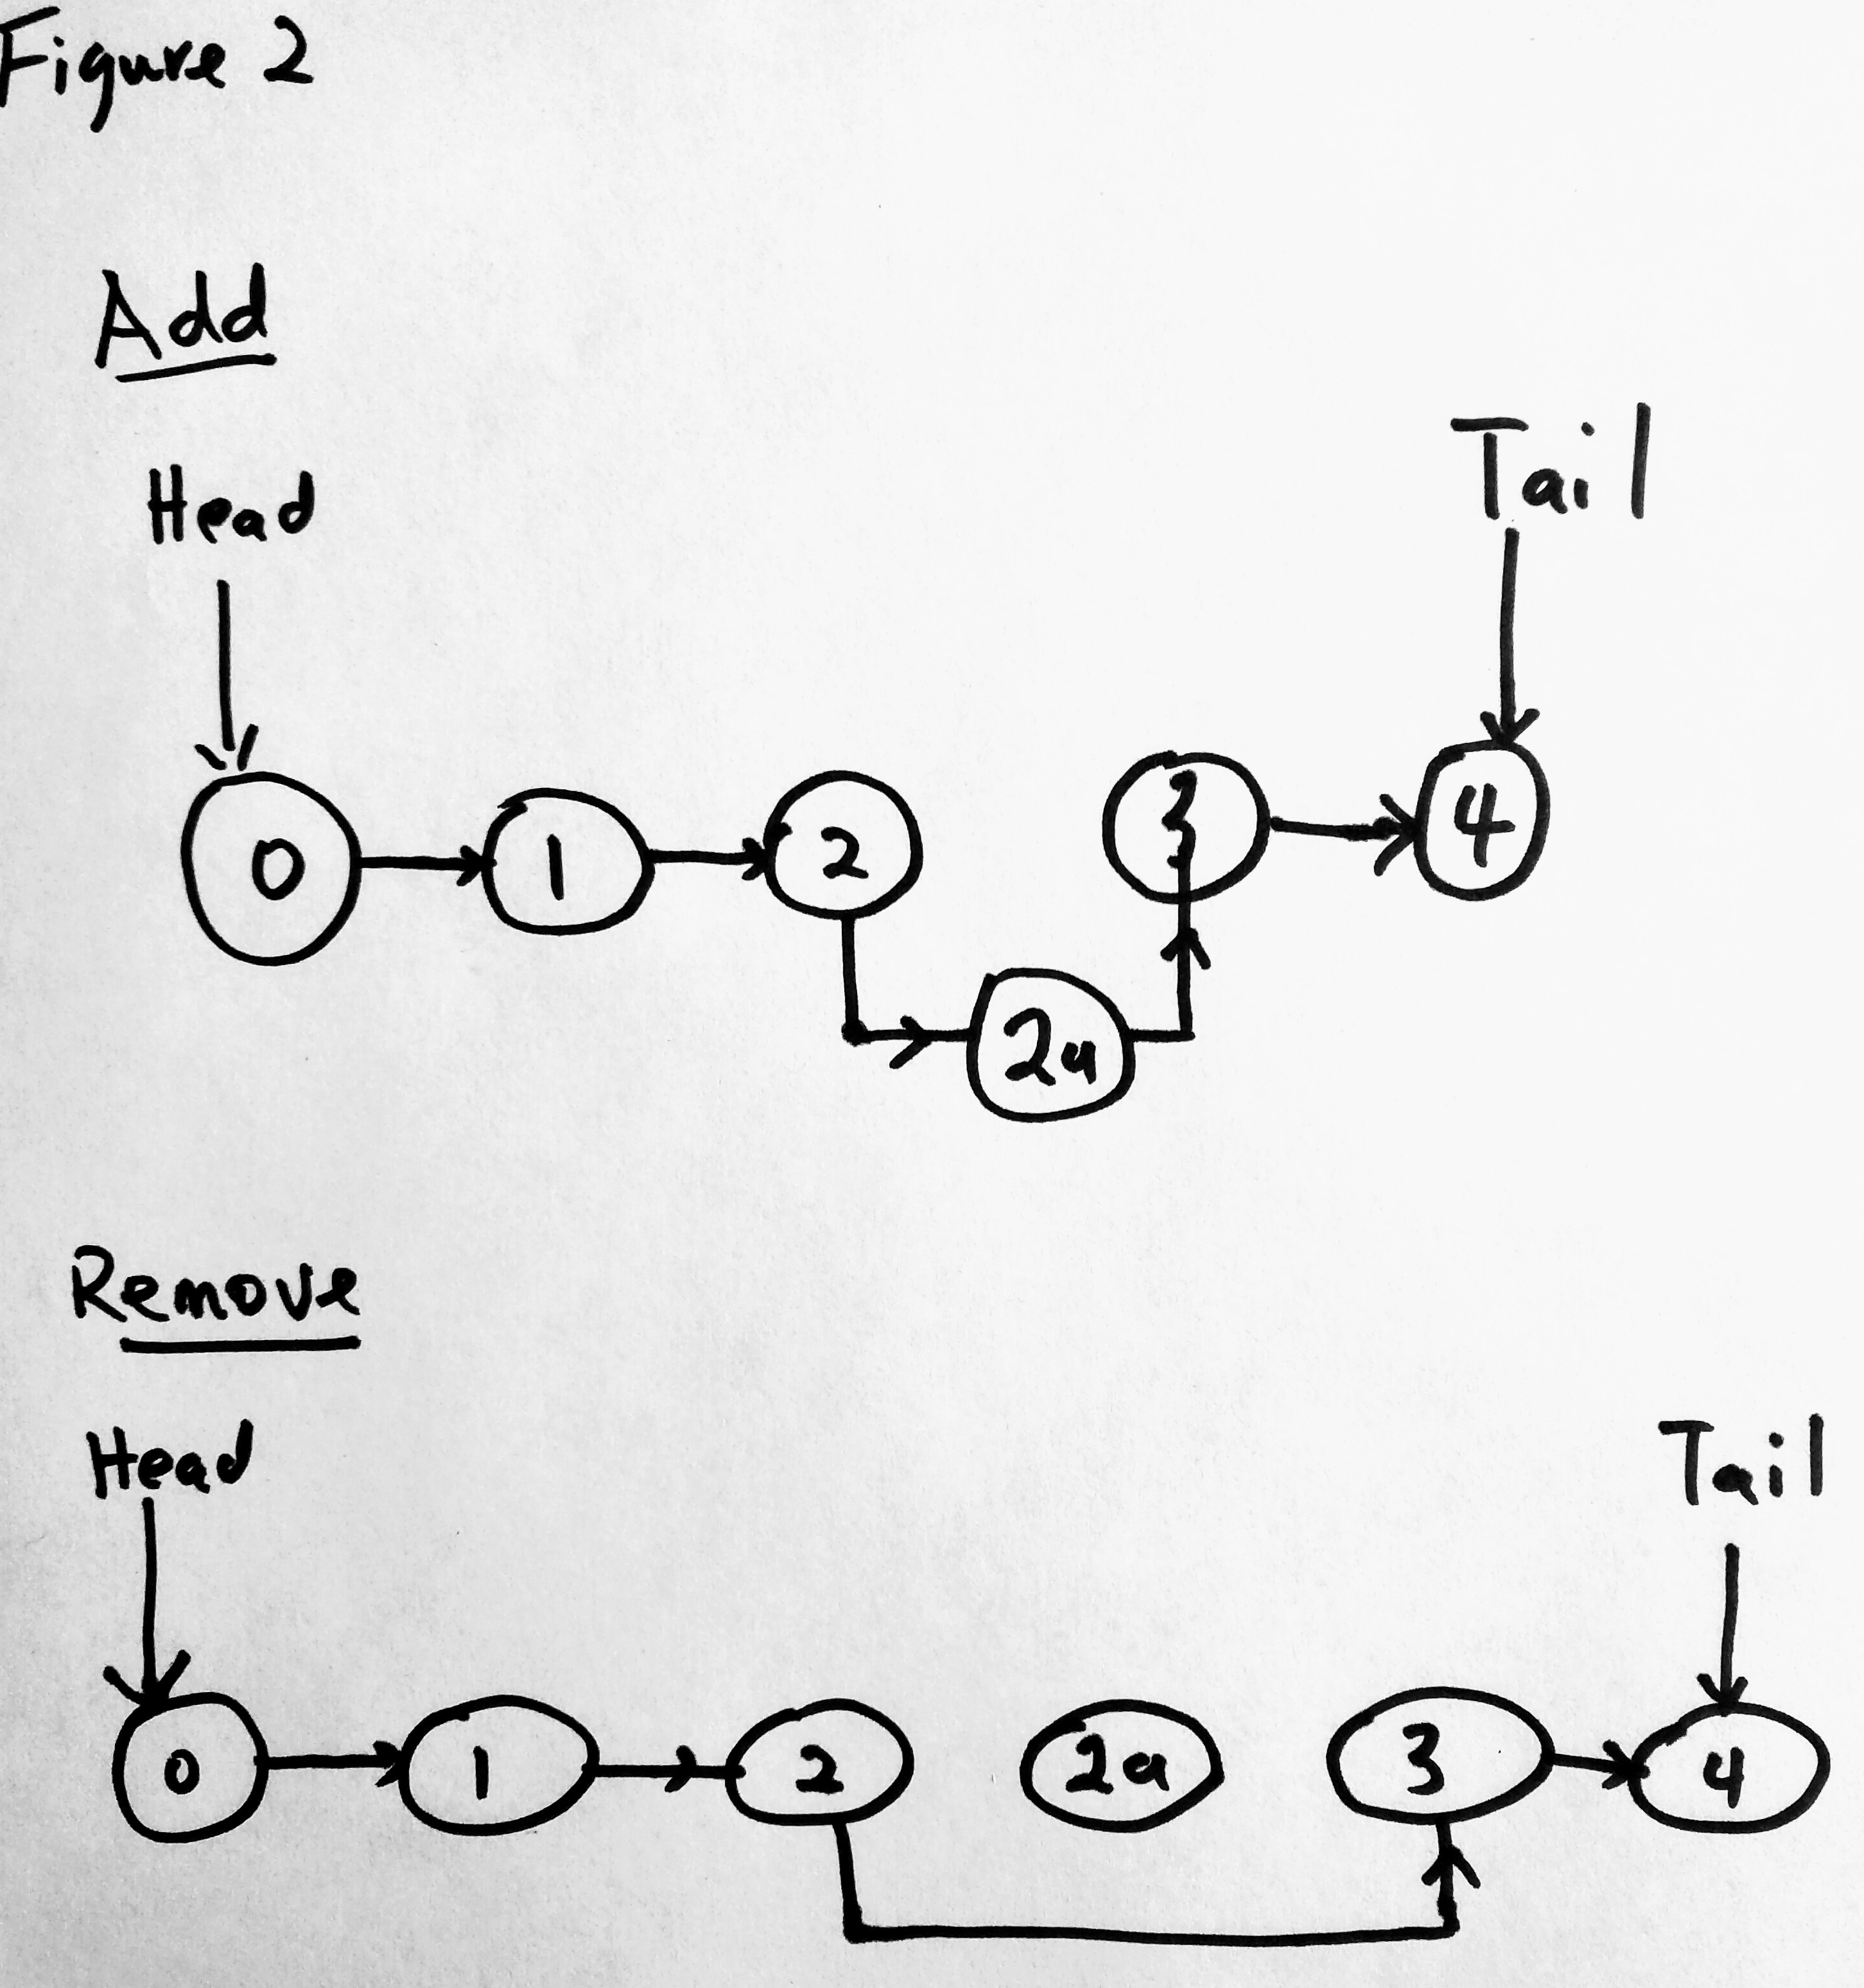
See what is going on here? In the add operation, we wanted to add 2a to our collection. The next node for 2 was originally 3, however we changed that node to point to our new node 2a and we set the next of 2a to be 3. If we decided to remove 2a, we set the pointer of the node before 2a (which is 2) to point to the next node of 2a ( the node being removed) which is 3. See now 2a is not part of our linked list collection (in diagram there is no pointer). When this happens that object is lost in the computers memory and it will be cleaned up by the garbage collector. You can also choose to set that node to null (i prefer doing this).
It is always good practice to draw these out as they help you write your code when the times comes. Enough talk already, lets get coding.
Singly Linked List Classes
We will be creating two classes (functions) for our linked list. Remember a linked list is a collection of nodes. We will create a Node class, and a LinkedList class which provides operations for nodes(such as adding, removing, displaying, etc). Optionally you could create just one class (LinkedList) and define a Node object inside. I will create two classes just so our implementation is a bit more modular. First the Node class
Node Class
The node class represents the object we want to add to our Linked List (remember the circular objects in our diagrams?). It is the basic building block block of a Linked List. It has an element property which is the data/value we want to add to the node. It also has a next property, which stores a link to the next node in the linked list. The node class is we are talking about now is that of a singly linked list. Lets starts with this type of linked list, and moved to more advanced ones later. Here is our Node class constructor function
function Node(element) {this.element = element;this.next = null;}
This should be clear and simple. We created a class that has two properties (element and next). You already know their purpose.
LinkedList Class
Next we create a linked list class (a container for our node objects). Remember a linked list really only cares about two properties. The head and tail nodes, so we will create these properties.
function LinkedList() {this.head = null;this.tail = null;this._length = 0;}
Here we have our LinkedList constructor function with properties defined. When you create a linked list, it is only natural that it is empty(length property of zeo). This is why the head and tail properties are set to null ( clearly there are no nodes yet ). I have mentioned a few times that we really don’t need to track the tail. But it gives us certain performance benefits. We may talk a bit about Big-O Notation later on. We also add the length property so that the linked list always knows how many nodes there are.
Linked List Operations
A linked list also has operations it needs to perform as mentioned earlier. Here are the operations we want to add to our linked list. We want to be able to addToHead, addToTail, insert, removeHead, removeTail, delete, indexOf, isEmpty, size, find, findPrevious, and display. Thats 12 operations we will be looking at. Notice i have a method to return the size of the linked list. Its only natural that at some point we will need to find exactly how many nodes there are in our list. When we add nodes to our LinkedList the length property is incremented. Our size() method returns the value of length.
Before we create all these operations on our javascript linked list prototype, let us test the code we have by creating a linked list and node object instances.
var foodList = new LinkedList(),pizzaNode = new Node("pizza");console.log(foodList); //LinkedList { head: null, tail: null }console.log(pizzaNode); //Node { element: 'pizza', next: null }
We create two objects. A LinkedList, and a Node object and console log them. Our console shows us that foodList is an empty linked list with head and tail equals null, and the pizzaNode has an element value of “pizza”, and a next pointer of null. Notice we don’t have any nodes in the LinkedList. Yes we have a pizza node, but its not in the linked list collection yet. For that to happen we will need to create methods on our LinkedList class to perform these operations.
LinkedList.prototype = {addToHead: function(element) {},addToTail: function(element) {},insert: function(position, element) {},find: function(element) {},removeHead: function() {},removeTail: function() {},delete: function(position) {},indexOf: function(element) {},isEmpty: function() {},size: function() {},display: function() {}};
If you like, you can add each operation individually to the prototype this way instead:
LinkedList.prototype.append = function(element) {//do append operation};
I find the above a little verbose. Having to write LinkedList.prototype every single time is a bit much. In a real world project i would use the first style. But for demonstration purposes, i will use the long way so we can focus on each other individually. You can choose whichever way you like.
Add To Head
Our first operation will be the adding to the head. All this does is add a new element to the beginning of the linked list. Lets take a look at this visually.
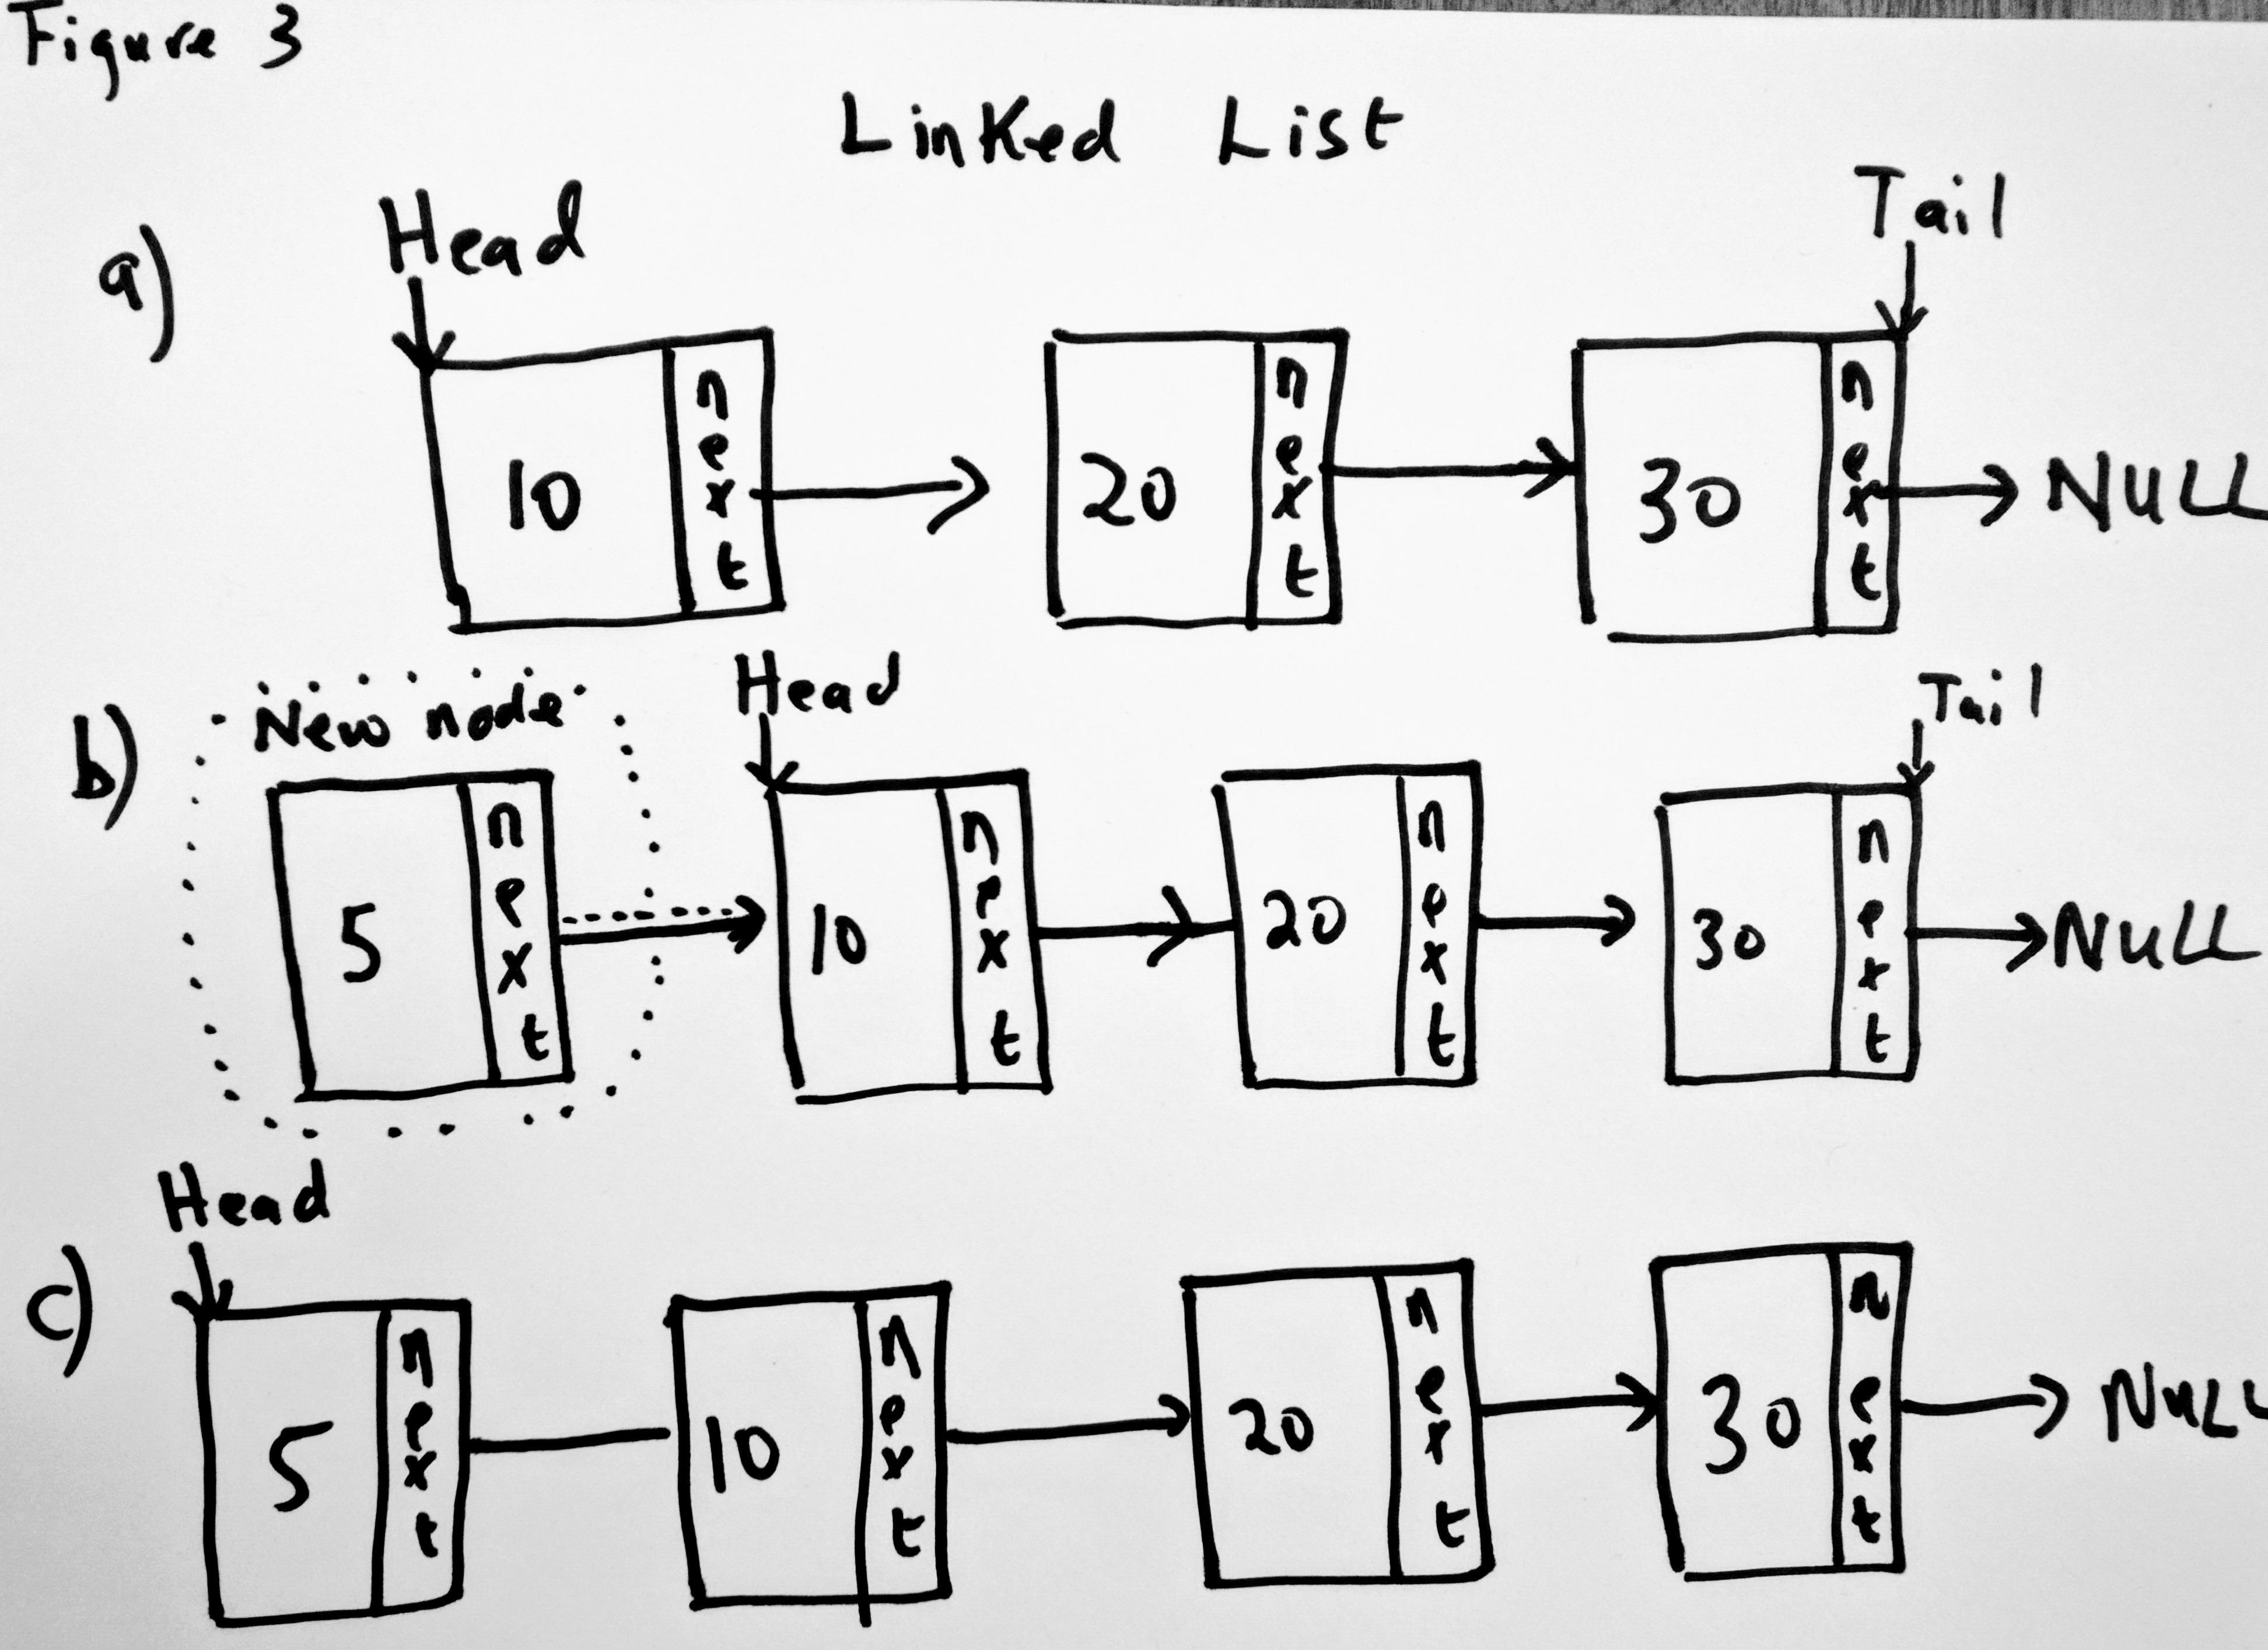
Lets say you have a linked list with 3 elements (figure 3a). The head of the linked list is the item with value 10. Then you decide you want to add a new node to the linked list (figure 3b). You add node 5 to the beginning of the linked list and then you update the head to point to 5, and the new node’s next to point to 10 (figure 3c). This is the operation we need to perform. When adding to the head, there are also two things to consider
- The linked list is empty and therefore this is the first element to be added
- The linked list is NOT empty, and we want to append to the list.
Lets write the code for this.
LinkedList.prototype.addToHead = function(element) {//create a new Nodevar newNode = new Node(element);// Handle case for when linked list is not emptyif (this.head) {newNode.next = this.head;//this.head = newNode;} else { // Linked list is emptythis.tail = newNode;//this.head = newNode;}//set the head to the new nodethis.head = newNode;//increment countthis._length++;};
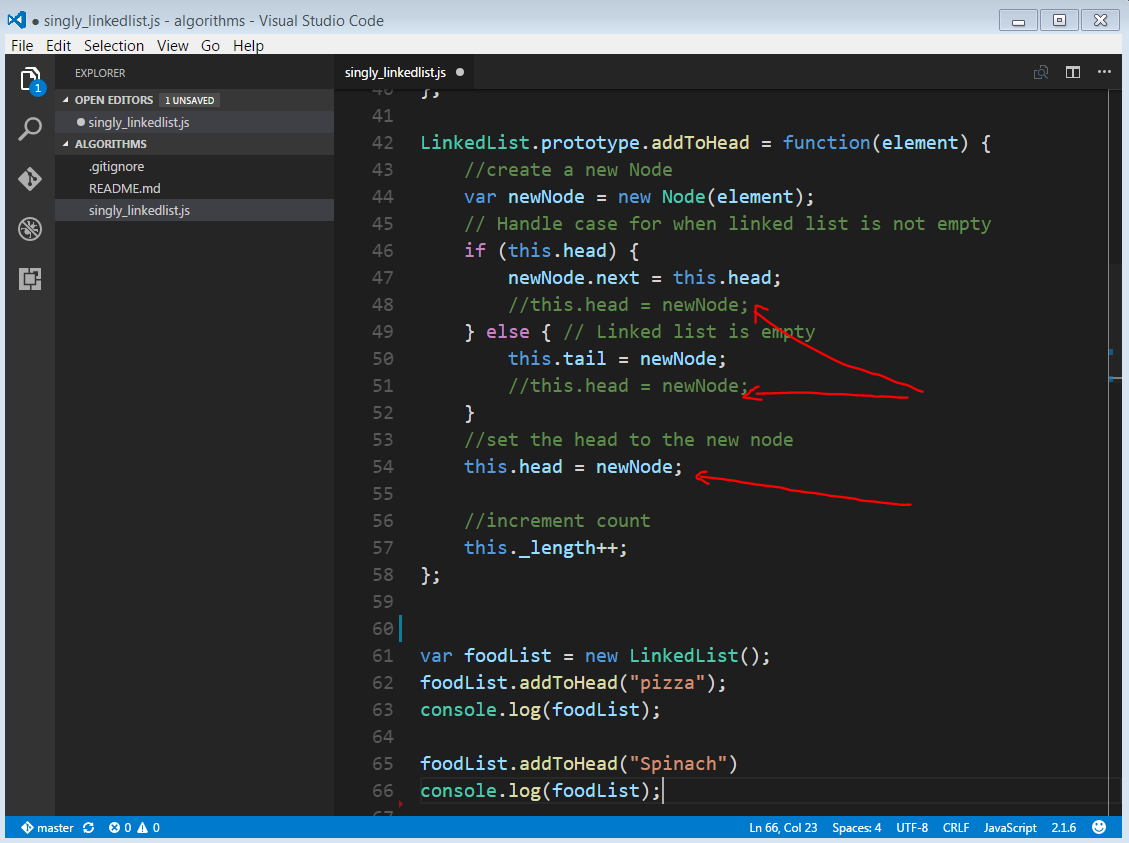
The code is a representation of figure 3. In order to add a node to the head of the LinkedList, we first create a new node. Then we check to see if the linked list is empty or if there are already existing nodes. If there is a head, then clearly there is already a node(s) in the list. So we update the next pointer of the new node to point to the current head, and we update the head node to point to the new node. If there is no head then there is/are no node(s) in the list and we can perform certain actions, like make the tail of the LinkedList point to the the new node as well as update the head to point to the new node. Remember if there is only one node in a LinkedList, the both the head and tail point to the same node. Notice that in the code i have commented out two nodes. See below (red arrows)
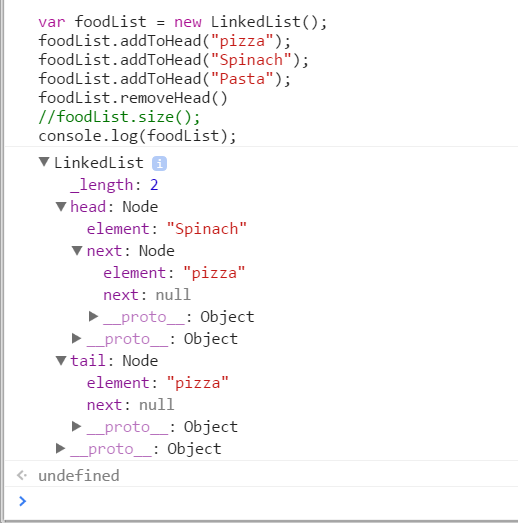
Notice that i commented some code out in the if/else statement. This is because they are the same code. This means we can strip them out of the conditional block. It doesn’t matter whether the LinkedList is empty or there are already existing nodes. If we add a node to it to the head, there will always be a new node. So we pull it out of the block and define it elsewhere (below). Lets take a closer look at our Debug Console in the screenshot above. You can see that i created a foodList LinkedLink and added the pizza node to the head of the foodList LinkedList(via addToHead method). Lets see how this looks like in the console by creating a linked list and added a node to the head.
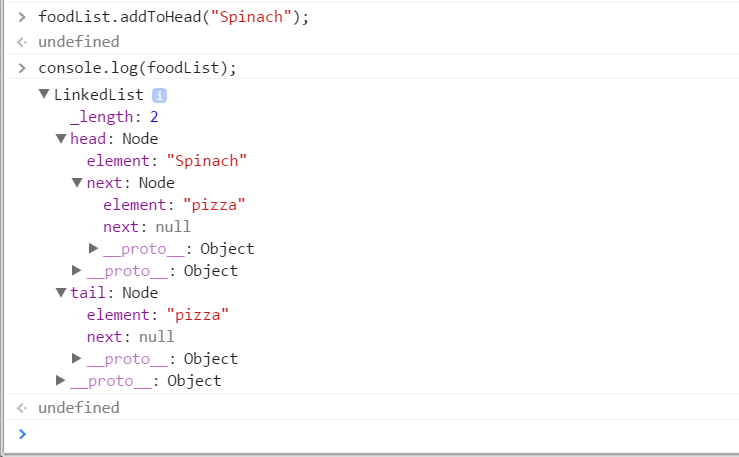
You can see that both the head and the tail have point to the pizza object. It only makes sense that if we add another food node to this list, that the pizza object will now because the tail (next node) and the new food object will become the head. Lets prove this.
All i did above was to add a new node by calling addToHead (we pass in the name of the node we want to add). You can see that Spinach is now the new head, and its next pointer is pointing to pizza! This makes total sense. We also see that the LinkedLists tail is also the pizza node. There is no next node after pizza (so that is null). Does that make any sense?
Add To Tail
Add to tail is like add to head. This is the opposite of add to head. Instead of adding to the front of the list, you add to to the back. Lets update figure 3.
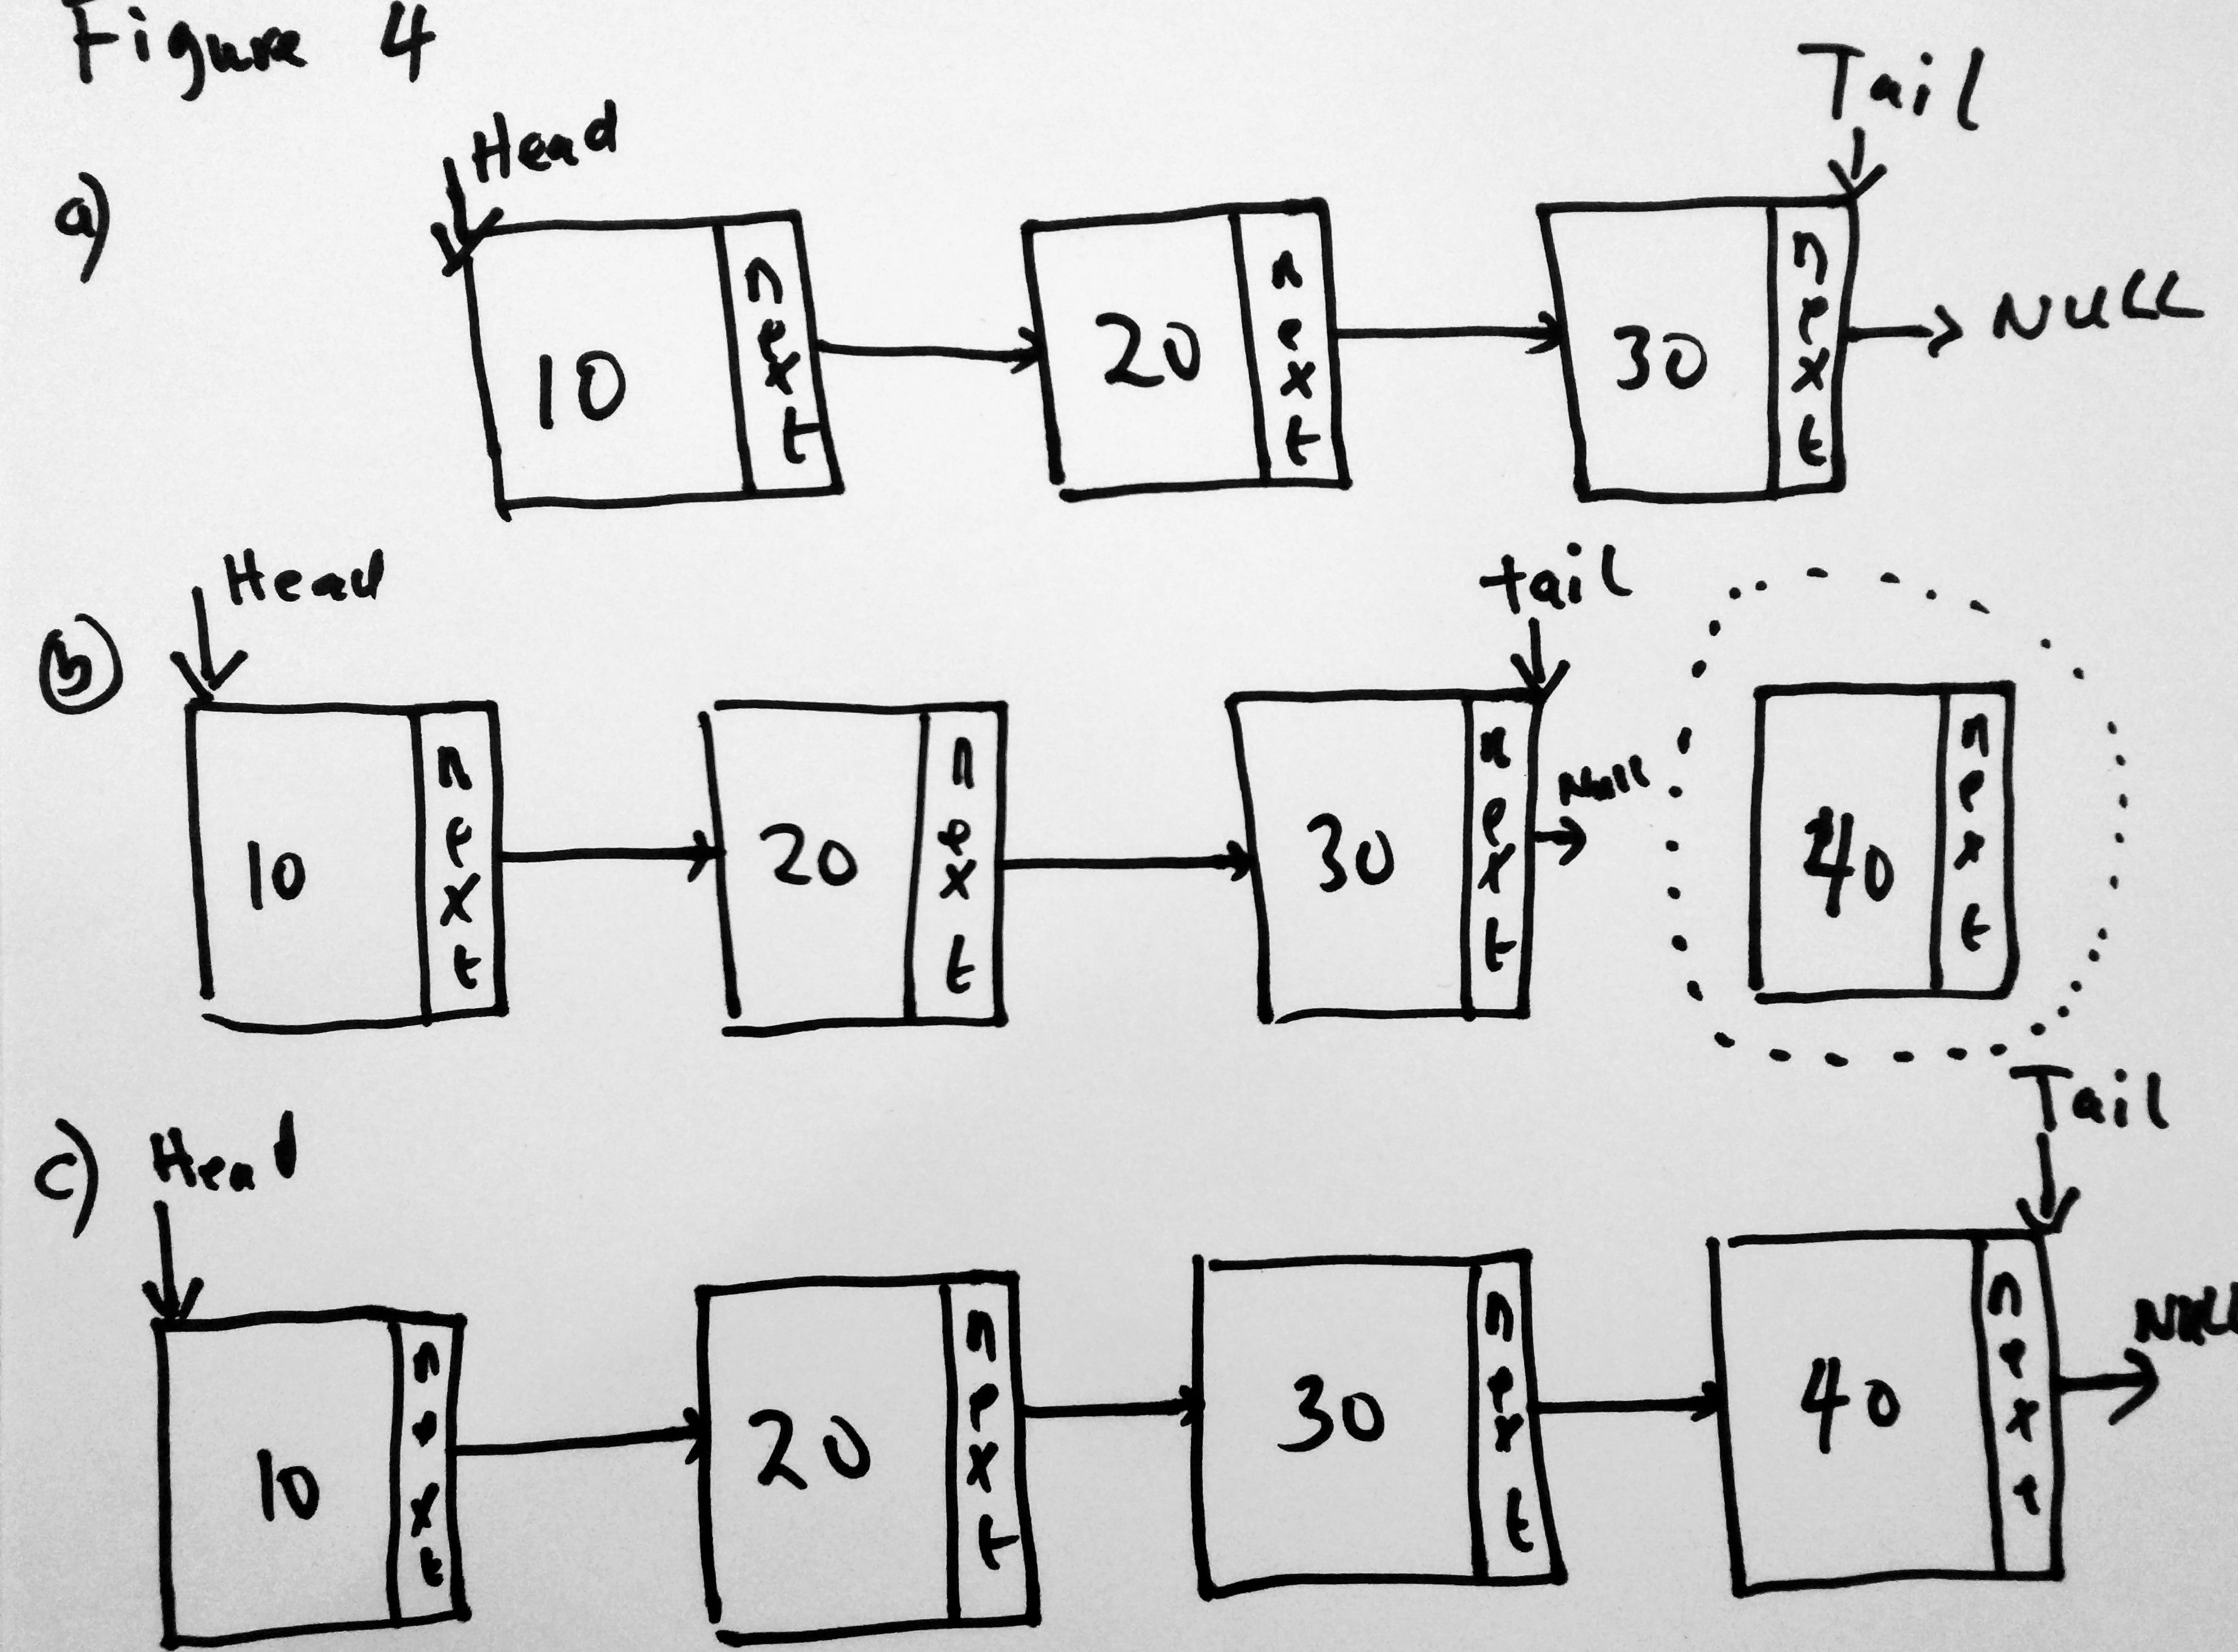
This time we add a new node 40 to the tail of the list. Before we did this, the tail of the list was 30, with a next value of null (figure 4a). We added a new node to the LinkedList ( figure 4b), and finally updated the pointers ( 4c). Lets write the code for this
LinkedList.prototype.addToTail = function(element) {//create a new Nodevar newNode = new Node(element);// Handle case for when linked list is not emptyif (this.tail) {this.tail.next = newNode;//this.tail = newNode;} else {this.head = newNode//this.tail = newNode;}this.tail = newNode;//increment count//this._length++;}
This code looks very similar to addToHead. We add a new node to our LinkedList collection. Check to see if there is already a tail. If there is, we change that current tails next node to point to the new node, and we update the tail node of the linked list to point to the new node. If there is no tail, then it means there is no head, so we set both the head and the tail of the LinkedList to be the new node. Simple stuff. Make sure you look at the diagrams when you try to solve these, its very simple to see how the operations works. Lets test our code by adding something to the tail. We already have pizza and spinach. Lets add pasta
foodList.addToTail("Pasta");console.log(foodList);
Lets see what the console log looks like.
Under the head tree you can see the first element in the linked list ( Spinach ). This was the second thing we added to our linked list and thus became the head. Notice that the tail is pasta. If you trace the nodes within the head as well, you notice that the last node (which is the tail) is also pasta. This makes sense as we added pasta using the addToTail method (so it must be added as the last node in the linked list). Now lets see how to remove the head or tail.
Remove Head or Tail
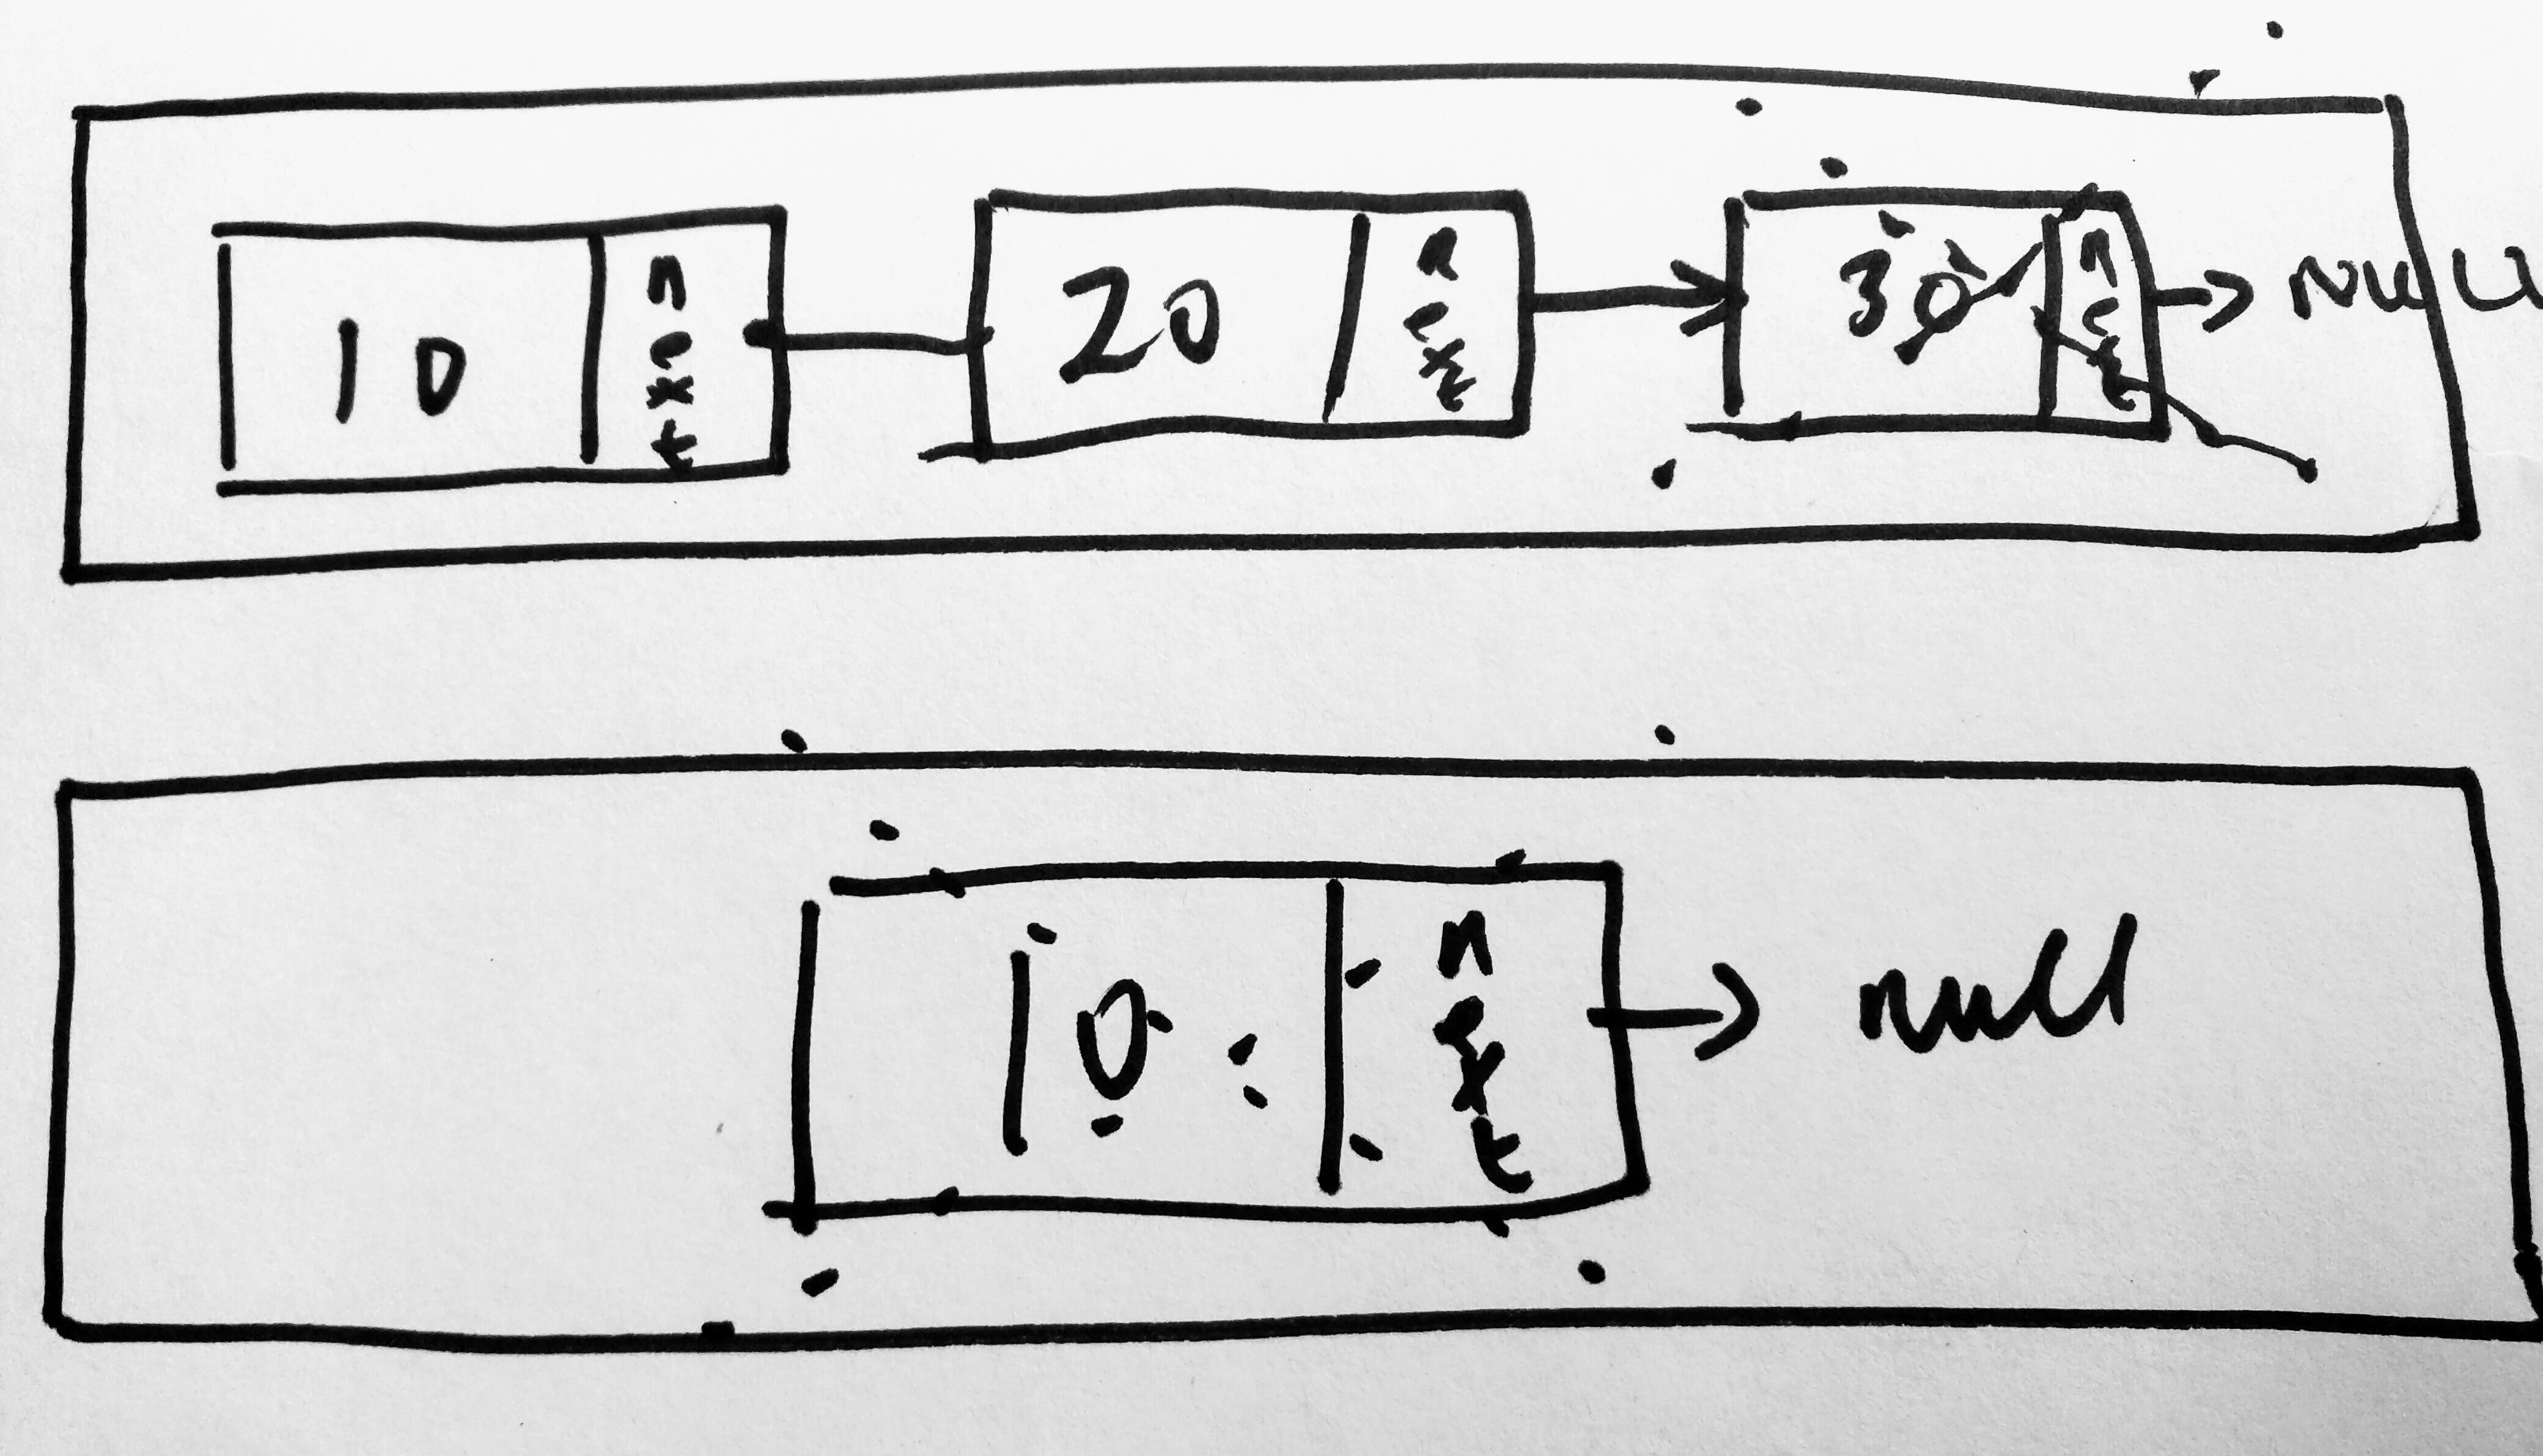
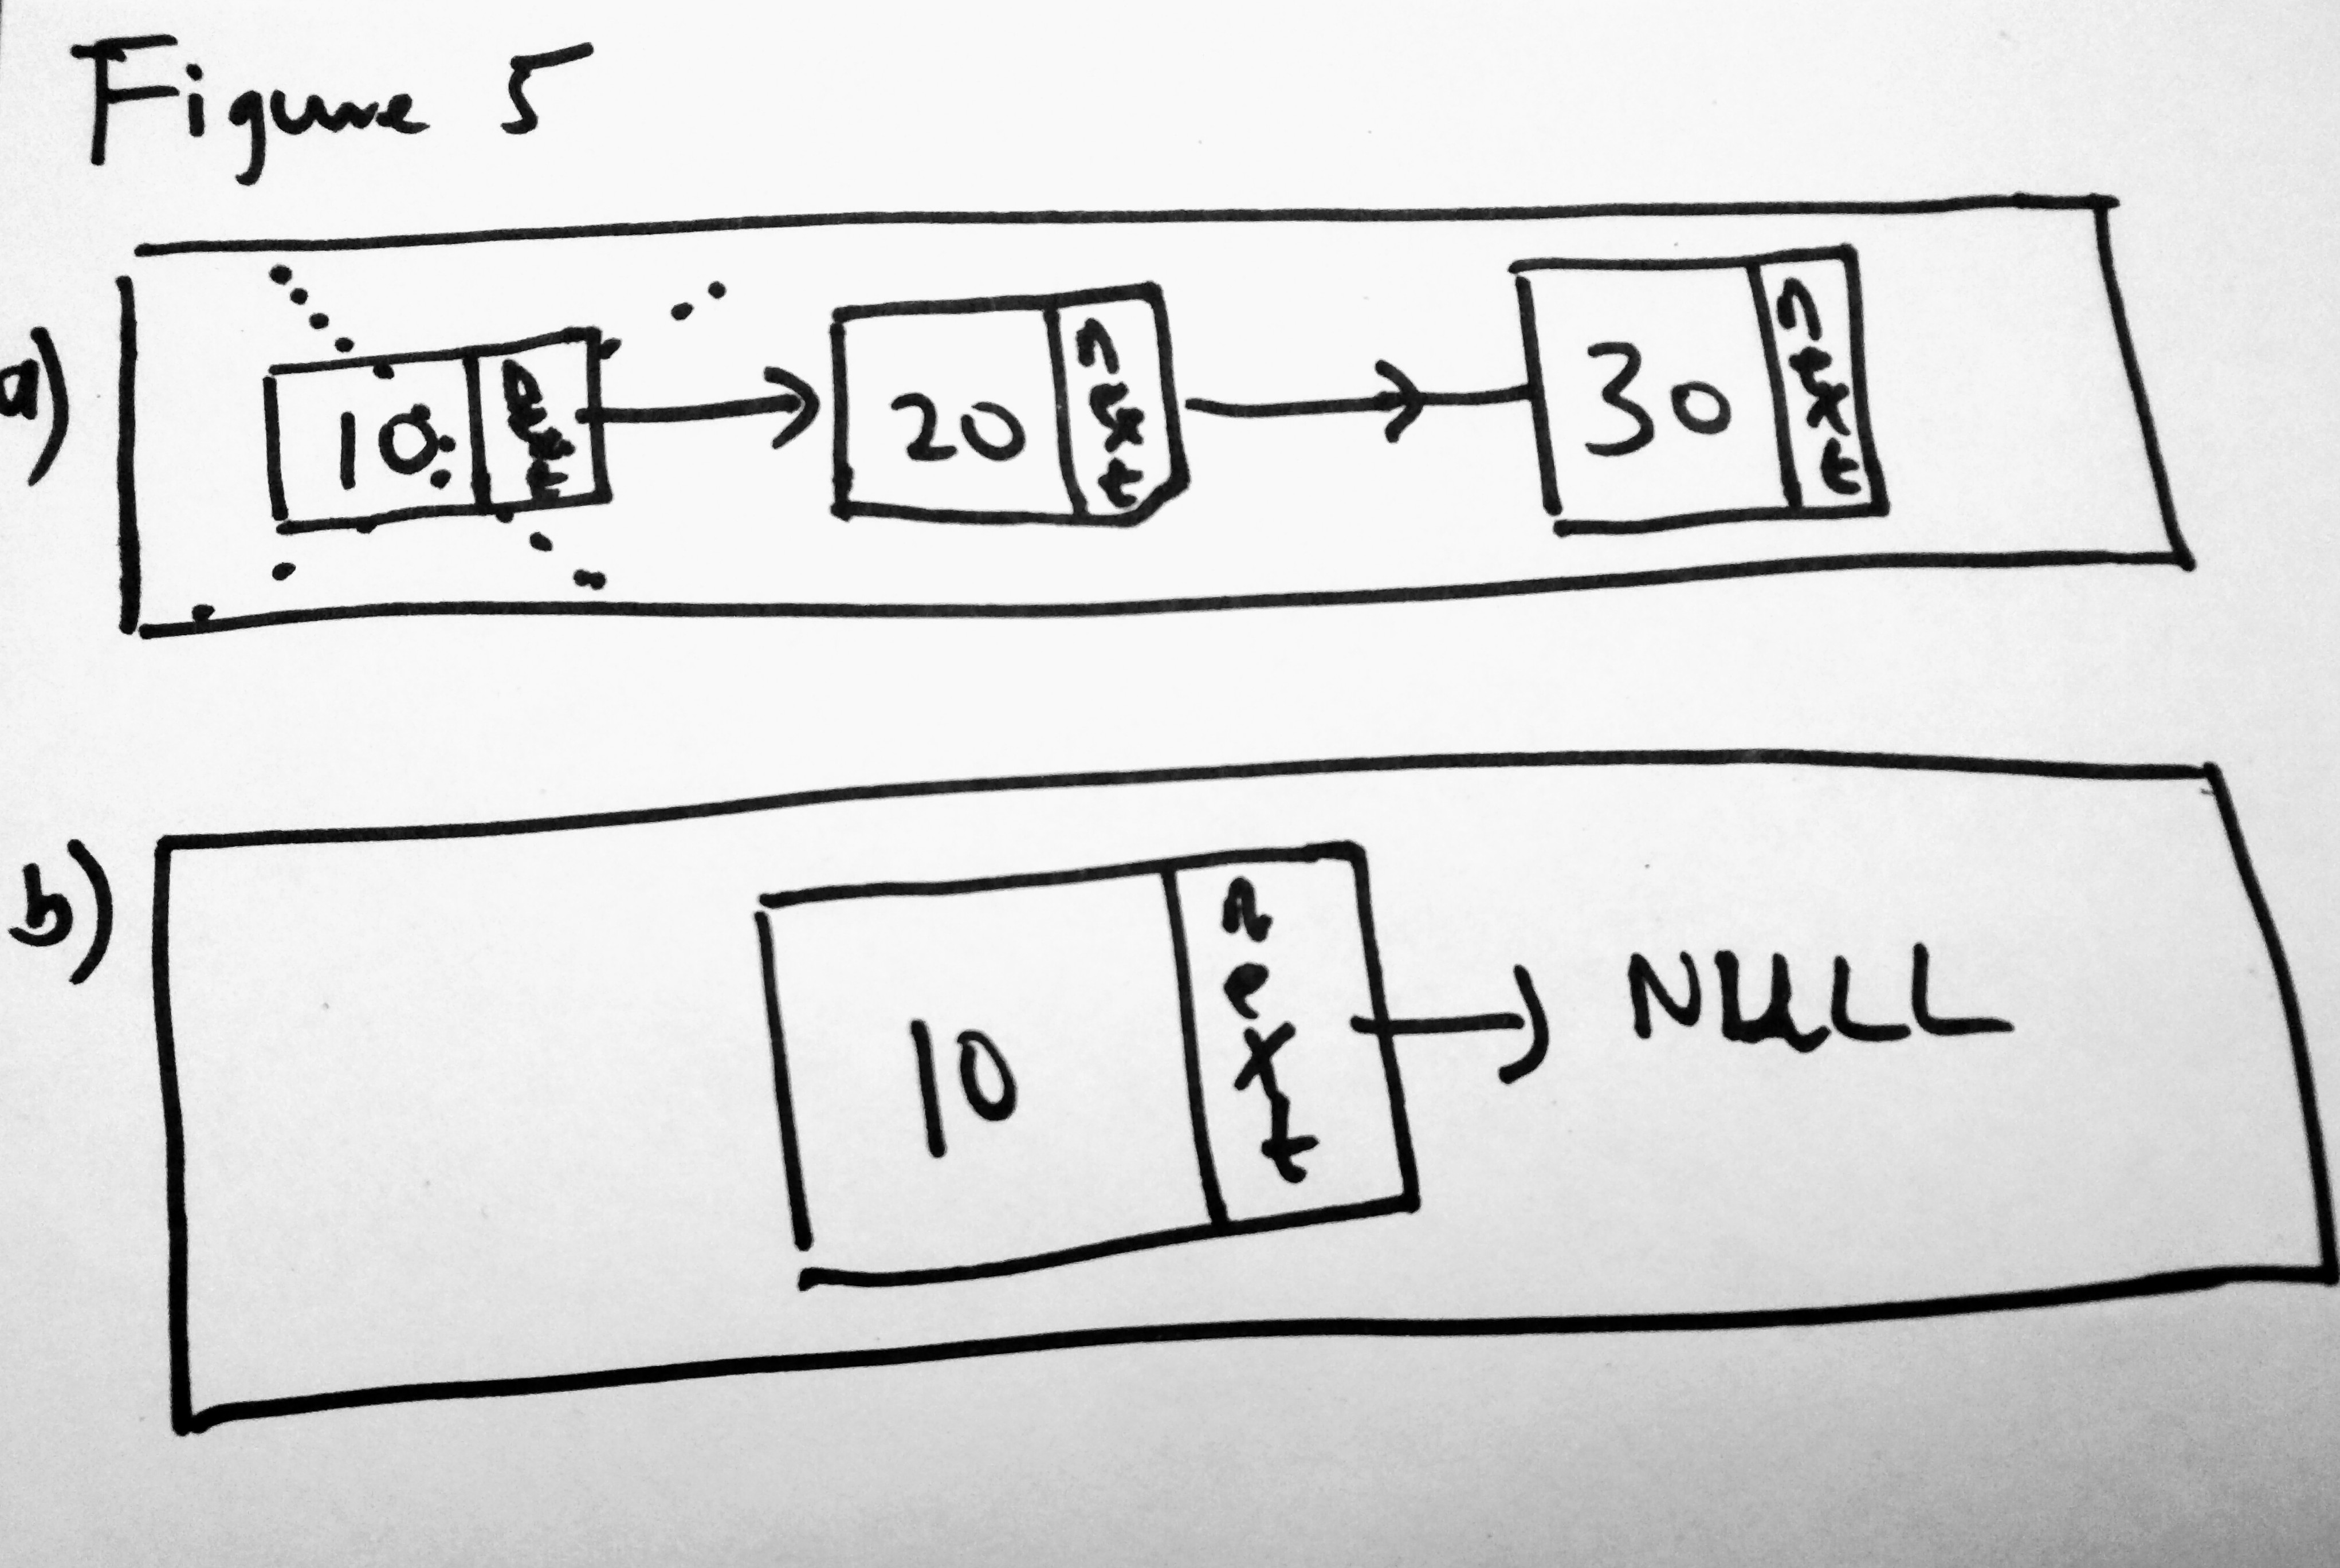
Removing the head is quite simple. Within a linked list, if there is a head, then its possible to remove it (see figure 5 below). If there is no head, it only means the linked list is empty. If however there is a head, it is also possible that there is only one node (the head) or there are multiple nodes. If there is only one node, then removing the head means the head and tail now point to null after removal. If there are multiple nodes then we want to make the next node of the current head the new head and set the old head to null.
Figure 5 demonstrates the case where the linked list either has one node or multiple. However remember that if there is no head, then there is nothing at all to remove. Lets see the code for this
LinkedList.prototype.removeHead = function() {//if there is a head, then there is a node or possibly nodes in the listvar headExists = this.head;if(headExists) {//save the current value of the headvar value = this.head.element;//case 1: there are multiple nodesif(this.head.next != null) {var temp = this.head;// there is another node so set that to the headthis.head = this.head.next;//set the temp (previous) to nulltemp = null;} else {//this.head.next is a null, means there is only one nodethis.head = null;this.tail = null;}//since headExiststhis._length--;} else {//there is no head OR !this.head... So linked list is emptyreturn null;}return value;};
This should be relatively simple to understand. Also take note that this time we are not adding to the length. If a head exists we are always sure to decrement the count in our linked list. Lets see an example where we remove the head node.
We added 3 nodes to the linked list. Since the last node added using the addToHead method was pasta and we called the removeHead function, we no longer see the pasta node in our console. Meaning it works!
size() & isEmpty()
Two other very simple operations worth mentioning is size and isEmpty. size() returns the number of nodes in the linked list. If you have been looking carefully at the console log you can see that the linked property is always incremented or decremented when you add or remove from head/tail. isEmpty() returns a boolean of whether the linked list is empty or not. Its good to have these methods, as we can use them to help write better algorithms. For example, you may want to find out if the linked list isEmpty before performing certain actions. We can actually re-write some of our existing code with this in mind. Here is how they look like in code.
LinkedList.prototype.size = function() {return this._length;};LinkedList.prototype.isEmpty = function() {return this._length === 0;};
isEmpty returns a boolean and you can test for true or false based on what is returned and perform some action. So far all the examples we have looked at are very simple. We are starting our journey into linked lists by first looking at the simplest of linked lists, the singly linked list. I felt this was important before starting to look at real world applications (that of doubly and circular linked lists). I am trying to get your mind used to operation flow of these systems. Notice that there is the idea of a previous node in a linked list, but for simplicity we have left them out for now.And its not that singly linked listed are not real world, they indeed have real world applications. For example, you may find scenarios where it is not necessary to track the previous node. When we start with the more advanced linked lists, you will see that it is much easier to understand because you have conquered singly linked lists.
insert(), find() and display()
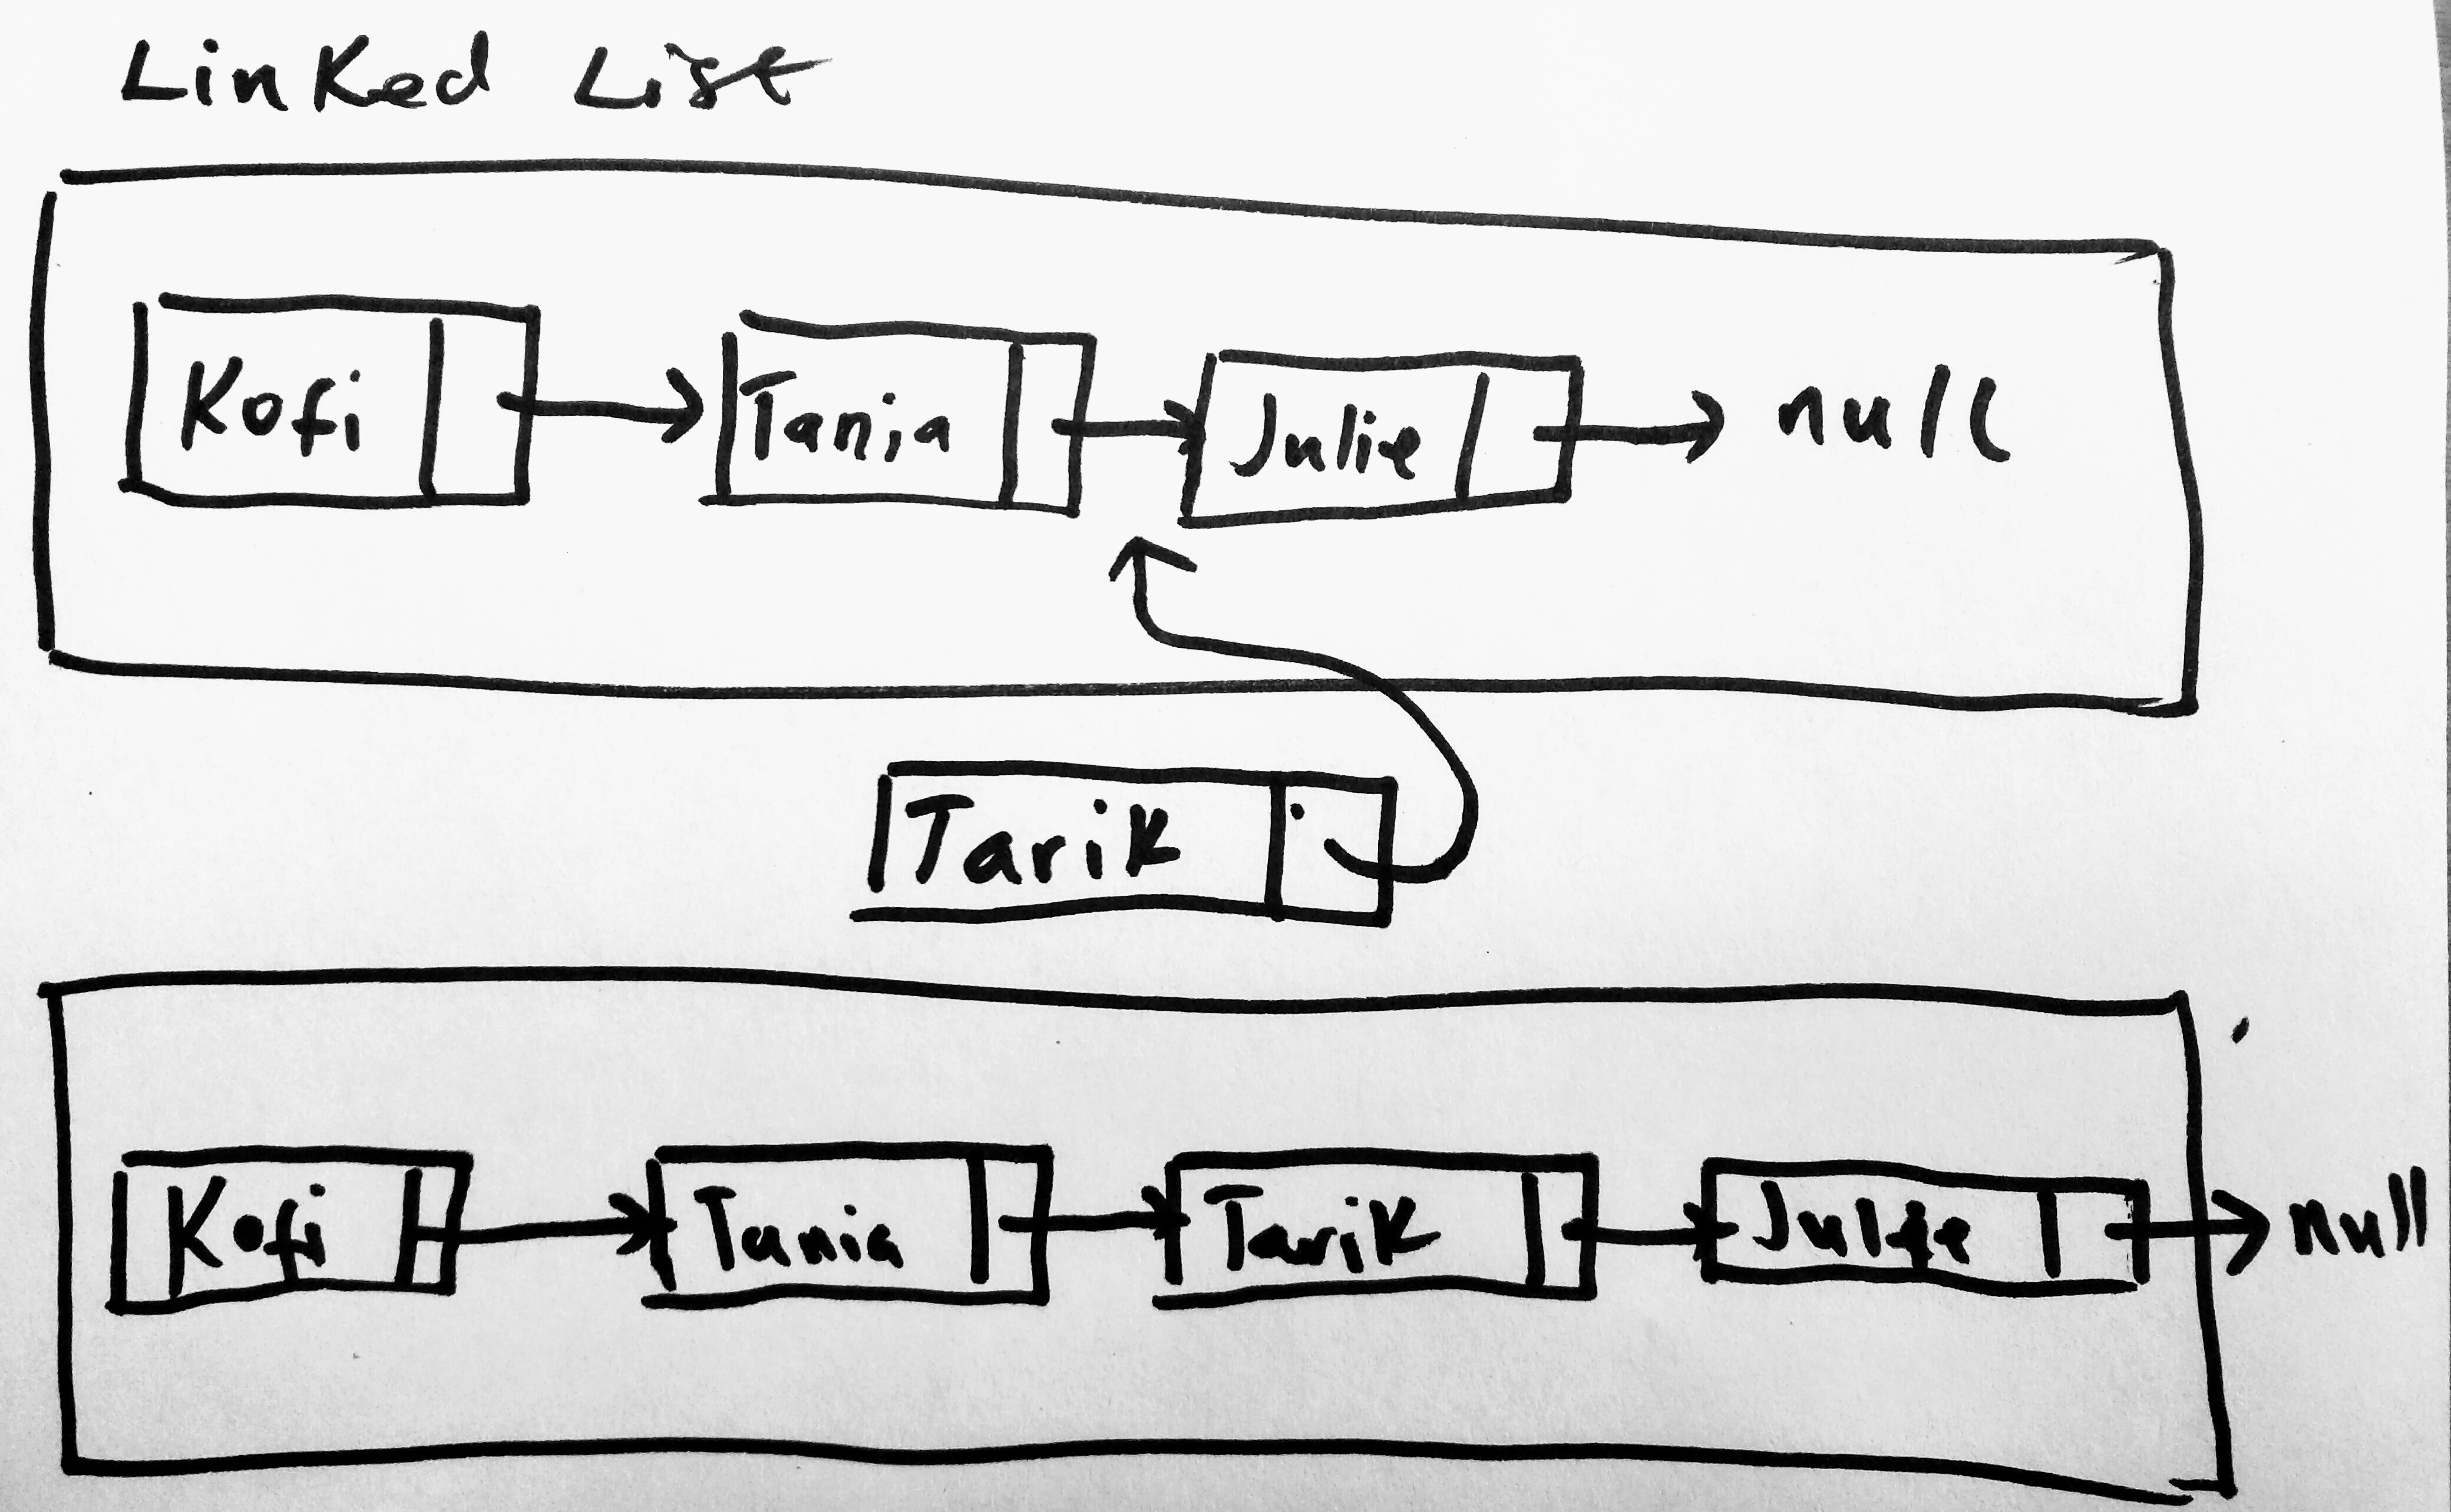
Insert is a special operation. Its special because it allows us to add a new node anywhere in the middle of our LinkedList (we already know how to add to head and tail) . To be able to insert a new node, you must of course know where you want to add it. You must be able to find the position in-between first. Say in our linked list, we have 3 names: “Kofi”, “Tania”, and “Julie” and you wanted to insert a new node called “Tarik” in between “Tania” and “Julie”, then you must first be able to find where Tania is in the linked list, update Tania’s next pointer to point to Tarik, then update Tarik’s next pointer to point to Julie. Lets see this in illustration.
Notice here that our original list does not include Tarik. But we want to add him. So we find Tania and update her pointers. We also update Tarik’s next pointer. Lets see how to perform this search:
LinkedList.prototype.find = function(item) {var currentNode = this.head;while(currentNode) {if(currentNode.element === item) {return currentNode;}currentNode = currentNode.next;}return null;};
So what is going on here? When we call find, we tell it what item we want to find (eg Tania). In order to start our search we start from the head of the linked list! We could have started from the end as well. We get what the head node is (a the current node we are starting on), and run a while loop. As long as a current node exists we check to see if the element or value property of that node is the same as the item we are searching for. If they are the same, then we have found what we are looking for and we return that node to whoever called it (our search function). With this function, you can find any item in a linked list.
For our singly linked list implementation we will not be using the insert method to add to the head or tail (we already wrote the code for that: addToHead and addToTail). So insert here only means adding nodes in-between. This does not mean that we wont handle cases where we want to remove the head or tail. If we do, we will simply call those methods from within our insert method. However when we start looking at more advanced linked lists (like the doubly), we will rewrite this operation to insert at any position natively. For now if we want to add to head or tail, we will use already existing methods.
Before showing you the insert operation logic, i wanted to point that we still don’t have any operations to display nodes in our linked list. Lets write that now as its easier.
LinkedList.prototype.display = function() {var currentNode = this.head;while(currentNode) {console.log(currentNode.element);currentNode = currentNode.next;}};
display is responsible for displaying nodes in a linked list. Its similar to find. We start at the head of the linked list and as long as there is a current node next property that is not null, we display the value or element of that node to our console. Lets move onto the next.
Our insert function uses both find and display as helper methods to do its operation. Lets take a look at insert
LinkedList.prototype.insert = function(position, element) {//create the new node based on the name passedvar newNode = new Node(element);//find the position or item node we want to insert after.var positionNode = this.find(position);//if the position node is found update pointersif (positionNode != null) {//first set the next pointer of new node to be that of position nodes nextnewNode.next = positionNode.next;//finally update the positionNode's next to be the new nodepositionNode.next = newNode;this._length++;} else {//position not found, return errorthrow new Error("Position Node Doesnt Exist!")}};
The insert operation takes two parameters. The first is the value of the position “after” which we want to insert, and the second is the new nodes value. So in our example earlier, if we want to insert a name after Tania, we pass Tania as an argument position. This tells the linked list, find Tania and insert a node after her. If we choose to insert it before Tania we could pass Kofi instead as the position. Well you might think, why don’t we have insertAfter and insertBefore operations? WE COULD! But i will leave that to you to do. Doesn’t really matter, you can write as many methods are you want. I wont write them because later on i will write an insert function that handles all case. But if you are curious, do write those two functions as exercise. Lets get back to our current insert implementation.
In this method we first create a new node that has the name of the element value passed in as a parameter. Then we search to see if the position of the node passed in exists. So we are going through our list to see if that node exists. If it does we perform some actions, if it doesn’t we throw an error. If the position node exists then we update our pointers: first set the next pointer of new node to be that of current position nodes next and then update the positionNode’s next to be the new node. If you have the diagram in front of you it is super simple to follow what is going on. Let us test our new function. We will create a peopleList linked list. Add some names and then insert new names at specified positions.
var peopleList = new LinkedList();peopleList.addToTail("Kofi");peopleList.addToTail("Tani");peopleList.addToTail("Julie");peopleList.insert("Tani", "Tarik");peopleList.insert("Julie", "Charles");peopleList.display();
We added Kofi, Tani and Julie using the addToTail methods. You can use addToHead of you like. Then we insert Tarik after Tani and Charles after Julie.
Our display function outputs everything in our linked list. You can see things are in the right order. Tarik exists after Tani and Charles after Julie. What if we insert a node at a position that is not valid?
As you can see, an error is thrown (“Position Node Doesn’t Exist”). Which is what we want 🙂
We are very close to finishing our singly linked list. We have a few operations left. One of them is removeTail. We delayed removeTail for later, as we needed a way to find the previous nodes in a linked list. In a double linked list this is easy, but as straight forward in a singl. Since we now have an idea of how to traverse our list, we can address removing the tail by finding the previous node to it. Note that in a doubly linked list every node has a next and previous pointer (so the previous is always available to you_. In a singly linked list, we don’t have a previous variable, like we have next, so we have to be a bit more creative.
removeTail
Lets start with a diagram
Here we remove from the last node in our linked list. In order to remove the tail, the challenge you will face is that you have to update the node that is previous to it. The only way to access this for a singly linked list is to entire traverse the list to find that node. I will introduced a new method called findPrevious.
LinkedList.prototype.findPrevious = function(item) {//start search from the beginningvar currentNode = this.head;while(currentNode.next != null) {if(currentNode.next == item) {return currentNode;}currentNode = currentNode.next}return currentNode;};
You pass the node you want to remove to this function. In this case the tail node. We create a while loop to start from the beginning of the linked list as long as the current nodes next is not null. Why? Well because if the current nodes next is null, then that is the tail node. But we want the one before the tail node. While this loop is going, for each validate iteration we check to see if that current nodes next is equal to the tail node. If it is so then it means we are on the previous node, and we return that node. We use this method in the remove tail operation.
LinkedList.prototype.removeTail = function() {var previousNode = this.findPrevious(this.tail);//case 1. there is only one node because next is nullif(previousNode.next === null) {//reset both head and tail to nullthis.head = null;this.tail = null;} else { //case 2 (multiple nodes)//update the next node (tail) to be nullpreviousNode.next = null;//set the previousNode as the new tailthis.tail = previousNode;}this._length--;};
RemoveTail first calls the findPrevious function to get the previous to last node. With that node, two things possible. Either that the returned node is the only node in the linked list, or there are multiple node remaining. If it is the only, then we just set the head and tail to null (which removes it from list), then decrement the linked list length property. If there are multiple nodes then the next pointer of the previous node will not be null. In that case we update the previous nodes next pointer to null (removing the tail) and set the new tail to the previous node. Lets move to our last operations.
indexOf(), remove() & removeAt()
indexOf is similar to find (so its used to search for nodes). What it does differently is return the index number(zero based) of the element within the linked list. If it doesn’t find it, it simply returns the value of -1. You pass the function the element you want’s index and the function takes care of the rest.
LinkedList.prototype.indexOf = function(element) {var currentNode = this.head,index = 0;while(currentNode) {if(currentNode.element === element) {return index;}index++;currentNode = currentNode.next;}return -1;};
This should be straight forward. You start searching from the head of the linked list until you find a node that is equal to the element that was passed in. During this search you keep count of the index numbers for the nodes and return that index number when a match is made.
remove and removeAt are used to remove nodes from a linked list. Lets take a look at their code
LinkedList.prototype.remove = function(element) {//find element to remove indexvar elementIndex = this.indexOf(element);return this.removeAt(elementIndex)};
Very simple. But there are some foreign methods in there. remove uses the indexOf operation to return the index of the element we want to remove from the linked list. Then removeAt gets that index and call removeAt with that index. Lets take a look at that code
LinkedList.prototype.removeAt = function(position) {var length = this._length - 1;//check removal bounds. check if position is validif(position > -1 && position <= length) {var currentNode = this.head,currentIndex = 0,nextIndex = currentIndex + 1;if(position === 0) {return this.removeHead();}if(position === length) {return this.removeTail();}while(currentNode) {//if the next is equal to position then update the current headerif(nextIndex === position) {//set the current next to pointer to the nexts next.var temp = currentNode.next.next;//set temp to nullcurrentNode.next = null;//finally set the current next to the objectcurrentNode.next = temp;return currentNode;} else {currentNode = currentNode.next;currentIndex++;}}} else {return null;}};
Probably the most lengthy operation we have written (hence the reason i saved it for last). I highly advice you take a look at the source code to this project on github which has a lot of code commenting. In the removeAt operation the function first checks to see if the position of the element you are passing in is valid. This is a good thing to do. You don’t want your code executing if passing in params are not valid. Its a waste of resources. We check to see if the position is greater than -1 and less than or equal to the total items in the linked list. For example if there are 5 items in the list and you want to remove item 7, then we don’t even waste time and return null. We can also choose to return an error (like invalid position passed). If the position is valid we check to see if the position is the head or tail. Since we already have functions already build, if the position meets this criteria we call our inbuilt functions. If position is not head or tail, then it means we have to search the list. We start our search from the head, and if the next index in the loop is equal to the position we are interested in, we update the pointers, if not we move to the next node and continue our search for the right position. Please review code comments for further clarification.
Ok we are approaching almost 6k words in this post. Time to wrap up! Understanding linked lists is crucial in any programming language. It is also important if you are planning on interviewing with top companies like Facebook, Amazon, or Google (my dream companies). You are more likely to use doubly or circular linked lists in the real word, but understand where they originate from; the singly linked list is key. There are many implementations out there. You can either write your own (i highly recommend if you truly want to understand it) or use an existing library. It all depends on what you want. I wrote this post so i could better understand them. If you think i should have done something differently, please comment on the post, i will be sure to update the code.
Lets continue to learn about doubly linked lists. We will write some of the code here and make it more solid for real world use. Thanks for reading. Feel free to reach out on twitter as well ( @scriptonian ) if you have any questions.





Awesome write-up, but don’t you think size() should return a Javascript Number instead of text?
Hi Amin… appreciate you commenting on the post. Thats the only way it can get better over time. Size returns this:
return “LinkedList Size Is: ” + this._length; (according to my code on github)
Where this._length is a number. I guess i did that for visibility? So a user can see a message when size is called upon. But perhaps this might get in the way right? Maybe one wants to use the number returned from Size to perform an action. Was that your point? 🙂
Exactly, who’d need that inside a real world program, just give me the number of elements not your loooong text. 😛
lol… yes! I will update it. Thank you:-)
In the below function element holds value as per your construction of Node object, you did not mentioned element has key value pair, then how to check the keys?
LinkedList.prototype.find = function(item) {
//console.log(‘finding… ‘ + item);
var currentNode = this.head;
var nodeList = [];
//console.log(‘current head of linked list is ‘ + currentNode.element);
while(currentNode) {
//console.log(‘current node key: ‘ + currentNode.element.key);
//console.log(‘current node value: ‘ + currentNode.element.value);
if(currentNode.element.key === item) {
//console.log(‘found something ‘ + currentNode.element.value);
nodeList.push(currentNode);
}
currentNode = currentNode.next;
}
return nodeList;
};